Posts Tagged ‘how to’

How to: Create A Facebook Page

laelene Posted in how to guides,Tags: , , , , , , , ,
27

[Editor’s Note: This is an updated version of the original blog post that is now nearly three years old! This includes up-to-date instructions after some changes to Facebook’s interface.]

pinnable quote image for how to create a facebook page blog post on maryqin.com

I decided it was time for me to create a Facebook page for my little blog, so I can really try to build it out and maybe get some followers! I’d like to think that what I’m putting out there is educating or entertaining someone, but I’ve never really promoted it so it’s time to take action.

When I went to create the FB page, I (for the life of me) could NOT find where to choose the “Personal Blog” category! And that’s what spurred this entry. Read on to learn the basics for setting up a Facebook page and how to select a category like “Personal Blog,” “Personal Website,” and more!

Creating Your Facebook Page

webpage to create a new facebook page First of all, here’s where you can create a new Facebook page. As you’ll see, right away they want you to choose a category. Your desired page may fit multiple categories, so it’s up to you to decide which one is best for your needs. Of the 6 types they’ve laid out for you (1. Local Business or Place; 2. Company, Organization or Institution; 3. Brand or Product; 4. Artist, Band or Public Figure; 5. Entertainment; 6. Cause or Community), all but the last one have a dropdown menu with category choices. Don’t worry if your desired category isn’t there – just pick what’s closest or tickles your fancy. In my case, I went for “Brand or Product”and chose “Website” from the dropdown.

You will be asked to enter your page name, which should be the title of your blog, the name of your business, or whatever you want the world to know your page by. Note that Facebook has certain rules in place about what is allowed in a name – for example, I tried to enter my blog name, ((little fat notebook)), but it was immediately rejected because I’m not allowed to use symbols. You are allowed one set of parentheses, but there can only be two words in it (like this) and obviously I’d have three if I went for (little fat notebook). Alas, I then tried just plain “little fat notebook” and that’s not allowed because the name must start with an uppercase! I didn’t like how Little fat notebook looked, so I went for the boring old Little Fat Notebook. Luckily, you can change it after the fact!

Setting Up Your Facebook Page

Once you agree to their terms and click Get Started, you’re prompted to fill in a description and add links to your site(s). They now allow you to choose your vanity URL (the pretty one that looks like https://www.facebook.com/littlefatnotebook instead of https://www.facebook.com/pages/little-fat-notebook/457453117668145). Check out my post on claiming vanity URLs to learn more. Choose carefully, you can only ever change it once after that. Next upload an avatar/profile picture to represent your page.

You can then add this new page to your Favorites area for quick access. That’s the part on the left when you go to Facebook.com. Finally, you can indicate your target audience including where they’re located, what age range they’re in, their gender, and their indicated interests. You’ll then be taken to your brand new Facebook page! A quick tour is given and then you’re given free reign. Feel free to add a cover photo, invite friends to like your page, and share your very first post!

area to set up target audience of new facebook page

Changing To A Better Category

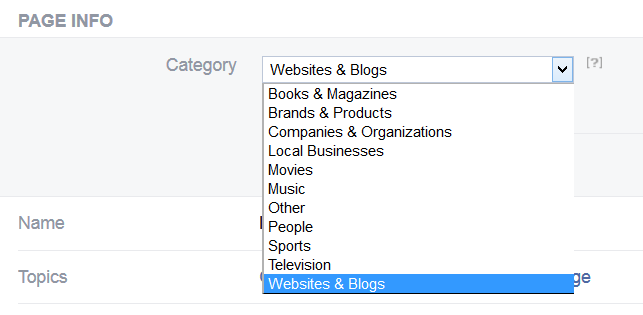
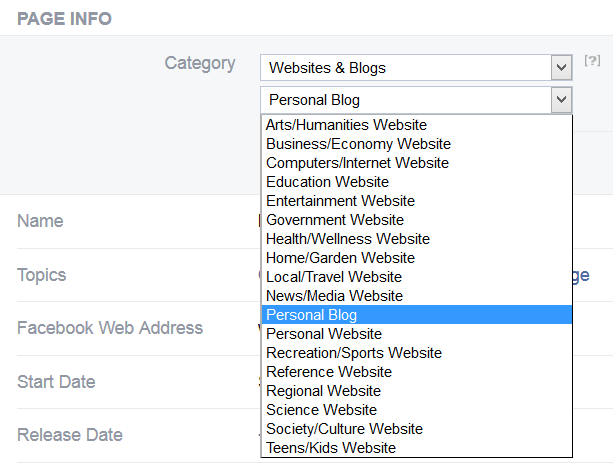
settings option for facebook pageNow here’s what you’ve been waiting for: how to make the page exactly as you want it! Under the cover photo area, click About. This takes you to Page Info where you’ll see the category you chose. Alternatively, at the top right, you’ll see Settings, which takes you to a page full of them. Along the left is a menu with “Page Info” – that brings you to the same place. Hover over the Category section to find the Edit button. From there you’ll see that the category and subcategory choices are far more plentiful than they let on earlier in the process! That’s where I found a previously unmentioned category called “Websites & Blogs,” which contains the subcategory option I had been hunting for: Personal Blog. The nice thing is that you can change this at any time, so as your site/brand evolves, you can update the category accordingly.page info section of facebook page

dropdown menu to edit facebook page category

dropdown menu to edit facebook page subcategory

So there you go! I hope that helped. If you found it useful, please like my page to show your support. 🙂

A few other tips:

When you reach 30 fans, Facebook will provide “insights” about your page, which include data about the reach of your page and each post (how many people see it, pretty much), how many people are talking about (sharing) your posts, and how many posts you’re putting up daily. You can also find cool demographic information about your followers. Basically if you’re into data, you’re going to love this part.

Note that I was able to update my page name from Little Fat Notebook to all lowercase. Unfortunately you still can’t add symbols, but as mentioned before, you can use one set of parentheses.

From now on, you can choose to interact with Facebook as yourself (personal profile) or your Page. This option is available for anything public that multiple profiles can access. You won’t see it for posts related to your private friends, for example, since Pages cannot post to personal profiles. But on other pages, you can choose to comment/like as yourself or your Page.

dropdown menu to choose facebook profile or page to interact as

I used to highly recommend putting your website URL in the Short Description so users can easily click to your site from your FB page. Now Facebook has added a Call to Action button instead, so you can set that up to get users to your site. None of the options are particularly blog-friendly though, so I’d like to see a “Read More” or “Read Now” action.

dropdown menu to set facebook page call to action button

Now that you have a Facebook page, check out my tutorials on:
~how to manage your Facebook page
~how to link your social media accounts
~how to claim your vanity URLs (as mentioned earlier in the post), and more!

You can find all my “how to” posts for useful tips like how to make a favicon and random things like how to set your iPhone/iPad to stop playing music at a certain time or even how to win a Facebook contest!

If you have any questions or tips of your own, I’d love to hear them! Please do share. 🙂

How to: make a browser tab act as a desktop program

laelene Posted in general blog,Tags: , , , , , , , , ,
0

When I learned of this trick, I was so excited! I hope your inner nerd loves it too.

Are you like me and hate having certain tabs open in your browser because you want to be able to use a site as if it was a separate program? Well, with Google Chrome you can basically achieve that! As I discovered recently, you can pop out certain sites you want to have open without having to resort to new windows or tabs. This way, it gets its very own icon in your taskbar and when you close it, you can quickly re-open it by clicking the image. This is called an application shortcut and is particularly useful for sites you listen to music on (so it’s like having a music player program open), sites you’re messaging with (so it’s like having an IMing program installed), or even just your favorite sites (like your blog editor).

I think you really need to try it out for yourself to understand it better. It’s a lot like the Add to Home Screen option on iOS devices (but the Windows desktop version), if you’ve done that before. Here’s how to do it:

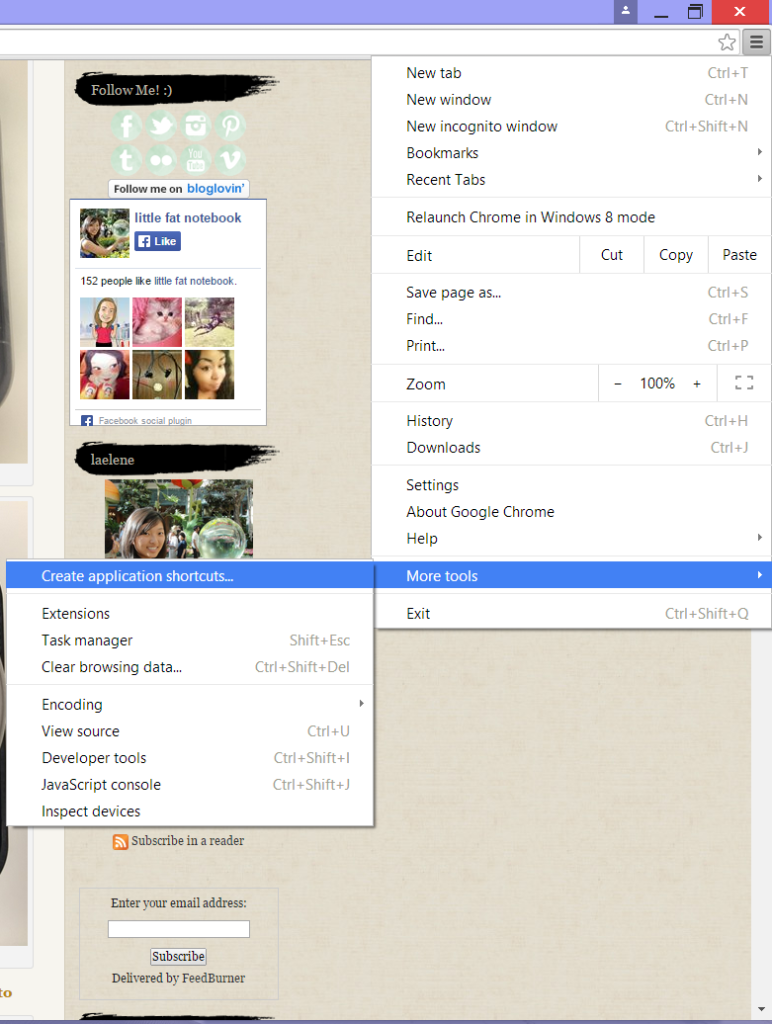
Step 1 – Go to the menu in the top right, More Tools, then Create Application Shortcuts…

google chrome browser application shortcut setting option

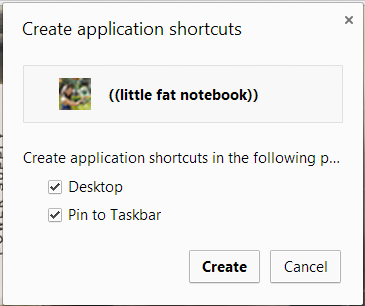
Step 2 – Choose one or both application shortcuts to create. You can create a Desktop shortcut and/or a Pin to Taskbar one.

google chrome browser create application shortcut options

Step 3 – Now your app shortcut sits on your desktop and/or your taskbar for easy access. Just click to open!

google chrome browser application shortcut on desktop

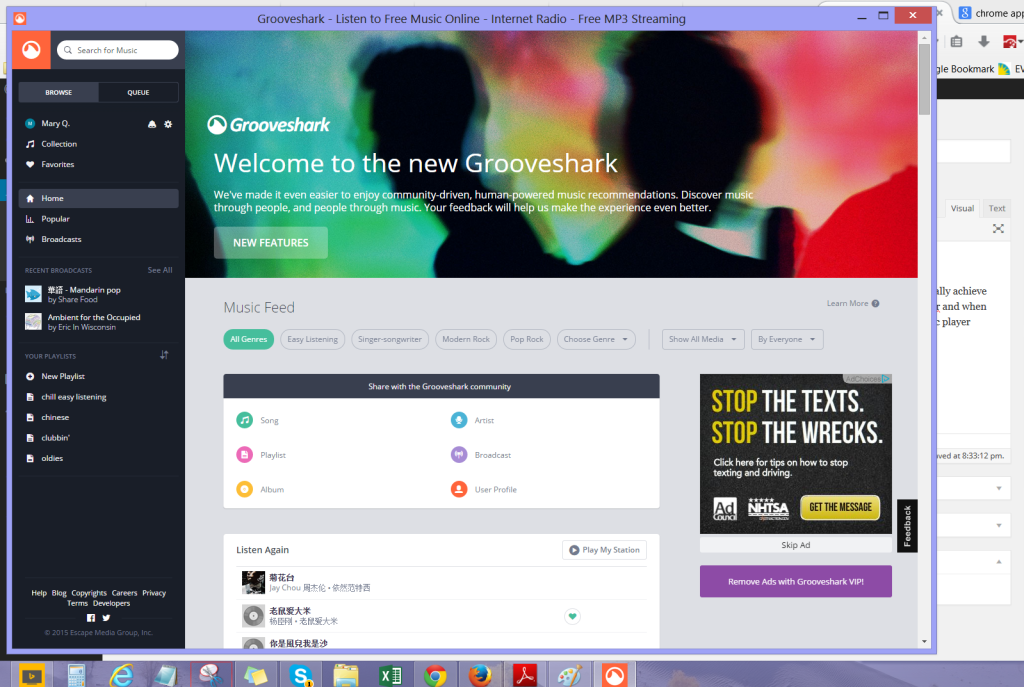
Here I set up Grooveshark so I can listen to music and quickly switch to it to pause my music. Behind it, I’m working on this blog post in the browser!

How to train a crab

laelene Posted in how to guides, lifestyle glimpses, photo blog,Tags: , , , , , , , , ,
0

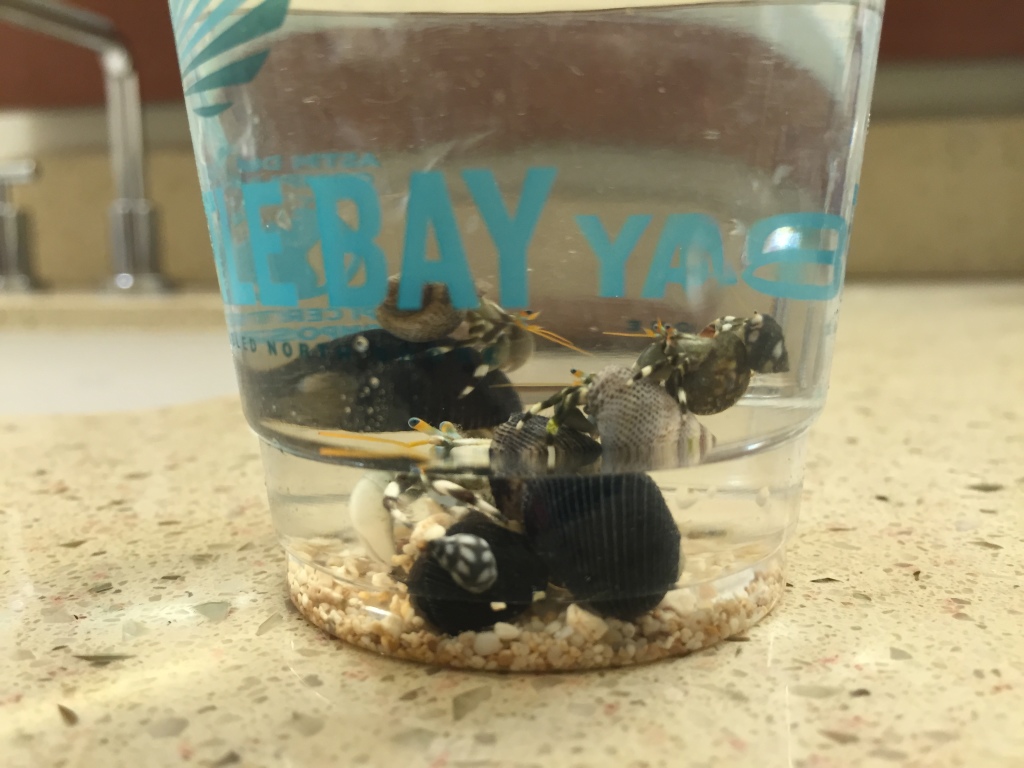
I’ve been playing with a variety of crabs of late and it’s fascinating. They’re rather smart creatures and I can almost swear they understand me. I’ve definitely stared into the eyes of some and felt like they could communicate with me. Maybe that’s just how their eyes look, but if you’ve ever tried to stare down a crab you might know what I mean. Sometimes their cunning is shocking. I’ve had them figure out how to climb up and out of cups, planning their escape. I’ve had them (somewhat) calmly crawl on me and learn that I’ll keep picking them up every time they try to leave. I’ve even had them working in teams to try to reach higher out of their temporary home in my cup.

tower of hermit crabs climbing on top of each other

The leaning tower of crabs. Smaller ones love to hitch a ride on larger ones!

clump of hermit crabs crawling on each other climbing up side of paper cup

Hitching a ride or using teamwork to escape?

line of hermit crabs crawling up side of paper cup

One by one, they learn from each other and crawl out.

It all started with some hermit crabs. It was the first day I got to go to the beach by the hotel (Turtle Bay Resort). I went wandering and eventually found a way to get to the beach I’d seen from the breakfast table. At first it was just tons and tons of snails on the rocks. I picked a bunch and was just enjoying the day playing around in the water with them when I noticed much faster movement. It was a hermit crab scuttling by! Once I knew what to look for, it was game over. I spotted so many that I had caught at least 30-something and there was no room in my cup. So I started to take pictures and release them. After all, what I really want are some close-up images of these cool creatures.

hermit crab staring at person holding it in fingers

If you just hold them, they’ll come out and look at you.

The next day, I went to the other side of the resort to check out what else I could find. It turned out to be a gold mine for other crabs. The land ones move far too fast to ever be caught, but the water ones have a tendency to hide and blend with the rocks. Since these rock formations have plenty of pools, it provided an easy microcosm to focus on. I was determined to get a “normal” crab (the kind that walks side to side). I succeeded with that eventually and got a crab that was almost too big for my cup! Now my goal is to get one of those burrowing crabs, which are a lot harder since they’ve got plenty of open beach to run across and even more sand they can dig below to escape.

crab hiding against rock and blending in

The crabs blend in quite well with the rocks!

crab hiding against rock and person pointing finger near it

I see yoooou.

ghost crab in hawaii sitting at entrance of tunnel in sand

My next challenge awaits.

So, how to train a crab:

1. Figure out where they hang out and go sit/squat nearby.

2. Stay still and watch for a bit. Look for an area they’re hiding where it’s enclosed enough for you to chase it.

3. Choose one that isn’t too large (no bigger than your pinky is probably best) and use a clear cup to get close to it. If we’re talking hermit crabs then just pick them up.

4. It takes a bit of back and forth to trick them into running into the cup area or falling into it as they scurry around. Just be careful and use one hand to guide them towards the cup.

5. Once caught, make sure you provide a decently comfortable environment, whether it’s just having enough sea water and not making it too warm or you need some rocks so the crab can sit out of the water too.

6. Keep it in the cup for awhile. Let it calm down and get used to this strange new environment.

7. After the crab is no longer desperately attempting to crawl out of the cup, you can stick your hand in and see if it’ll let you brush it. Move your finger around to guide it where you want to (that’s how I taught a crab that it actually could climb up the cup – of course then it wouldn’t stop climbing up the wall after that).

8. Before you know it, the crab will be totally fine with you touching it and might even crawl around on you! Beware, it’s definitely trying to escape though. If you’re good you’ll get some moments of peace where you can actually stare into its eyes, make that eye contact, and ponder its thoughts.

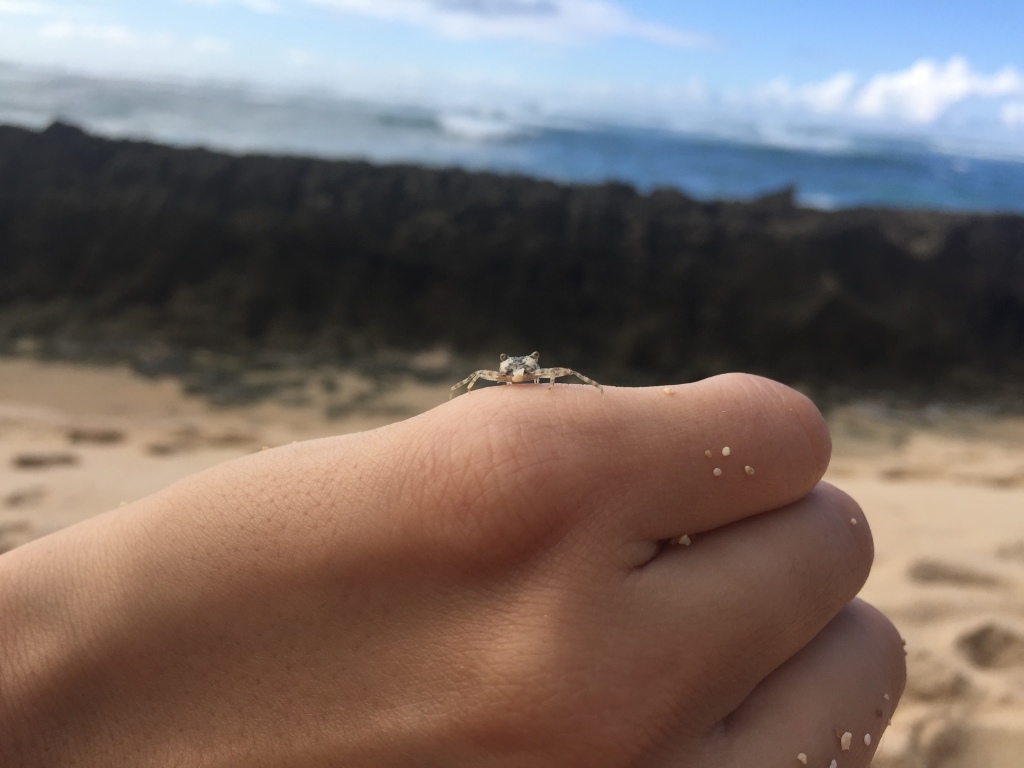
baby crab sitting on hand with ocean in background

Spending some quality time with my baby pet.

holding crab on hand smiling at it

Another one of my trainees, just chillin’ on my hand.

How to: set keyboard shortcuts

laelene Posted in how to guides,Tags: , , , , , , , , ,
0

Save time by setting your own personalized keyboard shortcuts on your iDevice! If you type a lot on your Apple device, there are probably certain words and phrases that you input all the time. In my case, I kept meaning to set up a shortcut for my email address so I don’t have to fill it out each time. This also helps prevents any typing errors I might have.

To set your own, go to Settings>General and scroll down to Keyboard. At the bottom are shortcuts and some might have been created for you already (like “omw” becoming “On my way”). Tap “Add New Shortcut…” to create custom ones.
The first line, Phrase, is what you want to be filled in when you use the shortcut.
The second line, Shortcut, is what you want to type to trigger the replacement.

screenshot of area in iphone settings to create keyboard shortcut

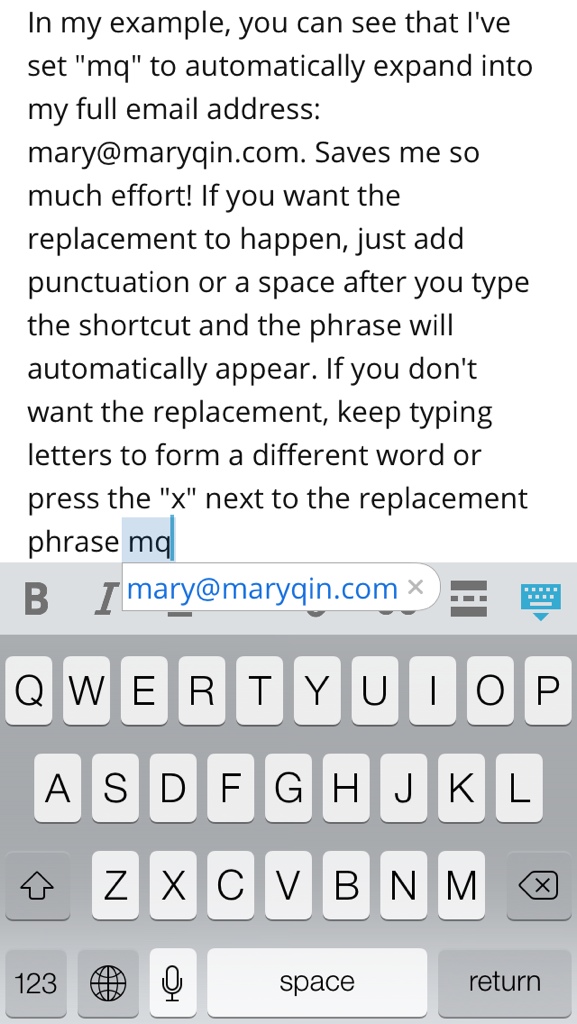
In my example, you can see that I’ve set “mq” to automatically expand into my full email address: mary@maryqin.com. Saves me so much effort! If you want the replacement to happen, just add punctuation or a space after you type the shortcut and the phrase will automatically appear. If you don’t want the replacement, keep typing letters to form a different word or press the gray “x” next to the replacement phrase as shown.

using keyboard shortcut in action on iphone

Easy! And now you can prevent excessive time being spent typing the same things over and over. 🙂

How to store your lightning charger

laelene Posted in how to guides,Tags: , , , , , ,
0

For awhile, I’d given up on using the charging cable for my iPhone 5. It started to come apart and I had to tape it at the end near the lightning head. It would only work at certain angles and I had to either hold it in place or very delicately position it with the phone on a surface. So, I bought another charger from a third party, which I loved. Unfortunately, it wore down over time too and stopped working recently. I started using my Apple-made cable again, but it was always a precarious situation and I could never be sure my phone was charging.

Finally, this weekend I was talking to Panda about it and he mentioned the possibility of getting it replaced. I figured I have nothing to lose, might as well try, right? So while his brother was in town, all three of us went out to the mall and found a guy at the Apple store. When I showed him my cable, he started to tell me about how normal wear and tear is not covered on the warranty and since mine was all taped up, he couldn’t replace it. He said he personally goes through them all the time (um, that’s not saying anything good about your product…) and then he shared some tips on how to preserve your lightning charger and minimize wear on it:

1. Always ensure the cable is straight when plugged in, both on the end plugging into your device and on the USB end. The connection to those areas are the weakest, and consistent bending causes them to rip.

2. Make sure you pull the cable from the firm plastic head and not the actual cable. This will reduce strain on the cable.

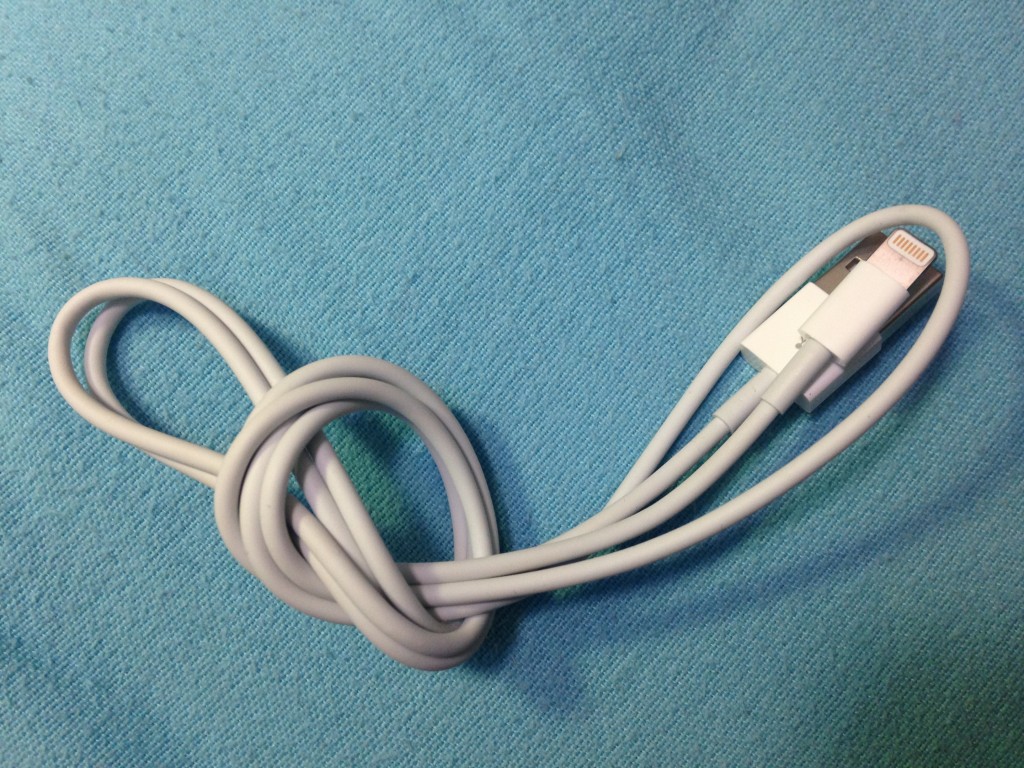
3. Never loop your cable a few times to store it, since this bends the ends. Instead, fold it over twice, then loosely knot that, as shown in the picture. This keeps the ends from bending, once again protecting the weakest points.

example of recommended way to store lightning charger cable as shown by apple store rep

Did you know this is a better way to store your cable?

Now this is all fine and dandy, but why didn’t they explain it to me when I got my device? It’s kind of too late now. Panda’s brother immediately asked to speak to the manager and as we explained to him how the tips were helpful (but way too late), I suggested that this is the type of thing they as an organization can educate us on when we buy a device. Panda asked whether the fact that my issue is not covered in the warranty was outlined, so the manager pulled up the agreement and looked for where it said that. It was pretty ambiguous with language about normal wear and tear (which means what, exactly?) and he must have been in a helpful mood, because he decided to replace my cable *this one time* (they always say that).

Luckily, some persistence (and getting to the right person who could actually make an executive decision), a peppering of questions, and a polite but disappointed demeanor seemed to do the trick for us. I got my new cable, no other questions asked, and now I am better educated on how to take care of it. Hopefully, you’ve now learned something that will help you from damaging your cables too!

How to Apply for a Chinese Visa

laelene Posted in how to guides,Tags: , , , , , , , , ,
1

What a ride it’s been applying for my visa to go to China! I watched as time after time, people were turned away because they didn’t have everything they needed for the application. It seems that the law changed in the past couple of years, so those who had been getting visas to China for over 20 years suddenly found themselves no longer meeting the requirements for the application (on their first try anyway). I don’t think a single person who was there for the first time had a successful experience. So, to help you avoid a similar fate, here’s what I learned to make your visa application process as painless as possible.

Short on time? Skip right to the tips list.

First and foremost, PREPARE thoroughly.

When I first saw the extensive forms of visas, I had no clue which one I wanted and I didn’t pay much attention to the requirements. After all, I’d done it plenty of times before so how hard could it be? Oh no, how naive I was. First of all, you have to fill out the form ahead of time. There are no longer forms at the embassy – my first big mistake. Luckily, there is a well-situated travel agency upstairs from the visa office in DC (what a smart move on their part), so I went there and paid $10 to fill out my form on a computer and print it out. Avoid those mistakes and download a copy and print it yourself.

sign and entrance to chinese embassy visa office in washington dcAll applicants are going to want to have a photo copy of their passport ID pages (for the office to keep once they return your passport to you), previous visa(s) to China if this is not your first, and a copy of your itinerary (proof that you will leave the country within an appropriate time period). If you’re like me and just got a new passport, you’ll want to bring copies of your old passport and visas that you had in there. If you’re getting a special visa that lasts beyond the typical maximum of 12 months, there are other documents to provide. This usually includes a signed letter from a Chinese native/resident or company, inviting you to the country and explaining the purpose of your visit.

Plan for at least 40-60 minutes at the visa office

Don’t forget to bring all your documentation! When you arrive, you’ll almost always find a dozen or more people in line to submit their application and it’s a painfully slow process. After all, they have to be thorough in reviewing your application. They also often have to explain exactly what is missing from an application so people can get it right the second time. And inevitably, there are those frustrated people who spent hours getting to the office only to find out they have to make another trek, so they vent and sometimes demand managers.

Wait patiently for 3-4 business days, then pick up your visa

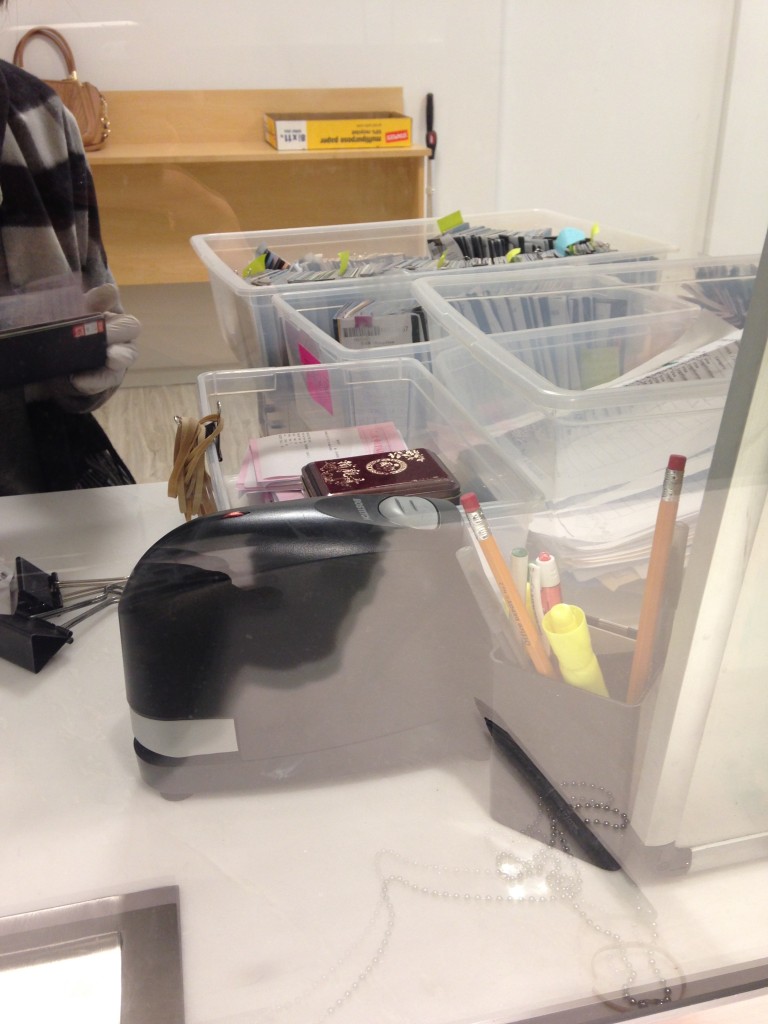
chinese embassy visa office windows for payment and pick upWhen you leave after submitting your application, you’ll get a receipt – hang on to it! It lists the date your visa will be ready and if you don’t get a call by that time, it means your visa should be ready with no issues. Picking up the visa is pretty quick, thankfully. Go first to the payment window and they’ll process your payment. All visas cost the same, no matter the length of validity and they’re currently at $140 for US citizens. I paid by credit card and then took my receipts over the to pick up window when the lady returned. She located my passport and showed me the page with the visa on it. I checked to make sure it was accurate – correct personal information, appropriate expiration date (two years from now, woo hoo!), and actually in my passport.

chinese visa payment window with receipt slip and stamp

Payment time.

passports in boxes ready for pick up after getting chinese visa

Boxes of passports.

So here’s a recap of the main points:

Download the application and bring it filled out along with a 2×2 photo attached (no more copies offered at the visa office)

Bring
-photo copy of passport
-copy of old passport (if recently outdated)
-copies of previous visas (if you’ve had any before)
-copy of travel itinerary (if already booked)
-invitation letter with name, ID number, and address of inviter (Chinese citizen or resident) – also include your name and passport number as invitee
-copy of front and back of ID of inviter

Apply at least 5 business days prior to intended travel (but preferably closer to 8-10 days in case there are issues)

When picking up your visa, bring form of payment (credit card is fine) and receipt slip

Did I forget anything? Do you have any lessons learned to share?

How to: Configure Touchpad Edge Swipe Gestures

laelene Posted in how to guides,Tags: , , , , , , , ,
0

If you’re on Windows 8 with a touchpad that has edge swiping gestures, you might be itching to deactivate that annoying left side swipe. I’ve been using my new laptop for a few weeks and I inadvertently switch between apps whenever my finger accidentally swipes from the left side of the touchpad inward. I couldn’t find how to make it stop, so I scoured my settings until I figured it out.

1. Swipe in on the right side to access the charm bar (the menu bar on the right side of the screen). You can also hover the mouse over either corner on the right side of your screen to get it to appear.

2. Click on Settings (last icon).

3. Click “Change PC Settings” text at the very bottom.

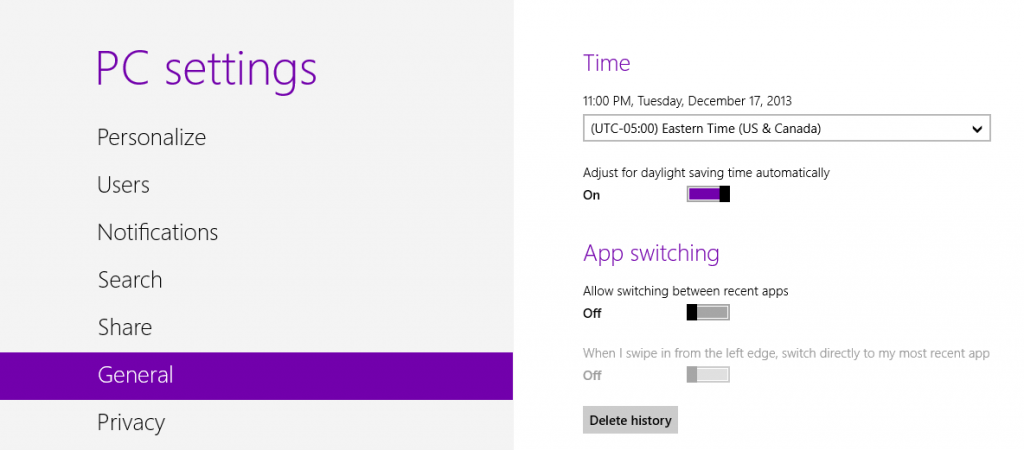
4. In the General section, find the App Switching subsection.

pc settings section to enable and disable left edge swipe

5. Turn off “When I swipe in the from the left edge, switch directly to my most recent app” to disable that edge swipe. Now when you swipe from the left, you’ll get the menu of apps on the left.

6. To take it a step further, turn off “Allow switching between recent apps” and there will be nothing when you do a left edge swipe.

That’s it! Simple enough, but they sure make it hard to find. I searched through touchpad and driver settings for ages before stumbling across the PC settings page. Hope that helps you too. Happy swiping. 🙂

How to: win free stuff

laelene Posted in how to guides,Tags: , , , ,
2

how to: win free stuff -maryqin.com

Honestly, when it comes to winning stuff, it pretty much boils down to a numbers game. Enter enough and you’ll start winning. But if you’re interested in a few other tips, here’s what I’ve found help me with winning more:

Find blog giveaways

When I set my mind to winning a Conscious Box, I did a search of giveaways online and found a bunch. I entered every single one I could find and I ended up winning two 3-month subscriptions! Similarly, I really wanted to win an Escape Monthly box and I did the same thing, also winning two different giveaways. Pretty awesome! Generally there are only hundreds of entries to contend with from these giveaways, versus hundreds of thousands for stuff being given away directly by brands. Of course you’re limited to items of more average value – you won’t really find cars and other big ticket items.

Befriend bloggers

If you find that certain bloggers seem to get or give all the things you want, it doesn’t hurt to make a friend. Start commenting on their posts and share your genuine interest. If they happen to know you loved something they reviewed or have access to, they might just think of you when they get a chance to share. Building great relationships can always open doors to opportunities. Just be careful not to cozy up to these people for the sole purpose of getting stuff. That sort of insincerity is not a good foundation for a friendship.

Promote yourself

If you’ve entered a giveaway, sharing it on your social media or even reaching out directly to the giveaway organizer can capture their attention. It could simply be sharing your excitement for the giveaway and thanking them. I’m amazed at how many people would only say something if there’s something to complain about. Giveaways are a nice thing and nobody ever said these people or organizations had to arrange them. Taking the time to thank them can go a long way.

Try consistently

When it comes to larger giveaways especially, the best thing you can do is enter as much as is allowed. Many allow multiple ways of entering or daily entries. Set up reminders so you can enter the max amount to improve your chances. I have a success rate of about 1-3% on things I enter, so if you haven’t entered at least 100 giveaways then I doubt you’ve set yourself up to win. Keep trying!

Think positively

If you approach things from a good perspective, you’re more likely to do things that enhance your chances of winning, like promoting yourself and befriending people who’d give you stuff. It’s also just nice to put out that positive energy into the world. If you want to be a guaranteed winner, try hosting a giveaway of your own – making someone else’s day is a surefire way to feel fabulous. 🙂

Have you won things? What do you find help with your chances of winning?

6 tips for landing a job in one month

laelene Posted in how to guides,Tags: , , , ,
0

I’ve had a pretty good track record when it comes to finding work. Whenever I’ve wanted to find something, I’ve been able to land a job within a month of initiating my job search. I hear of a lot of stories about people searching for months though, so I thought I’d put together some tips for how I optimize my efforts. Perhaps I’m just more flexible in my search, but I’m probably doing some things right too!

six tips for landing a job in one month at maryqin.com

Tip #1: network!

An important thing to do while you’re job hunting is make sure you mention it to people. You never know when an off-hand remark about your job hunt can lead to a promising opening. Strike up a conversation with that stranger in line and you can usually insert the topic since it’s common to discuss what you’re up to. Don’t be spammy and talk about nothing but how hard it is or what your dream job would be, but don’t be shy about bringing it up. They might have great suggestions for where to look or you might just get a referral!

Tip #2: use your social groups.

You should definitely try to make an effort to meet more people and expand your network, but also tap into your existing networks: family, friends, classmates, previous coworkers, etc. If you’re meeting up with friends, they’ll probably want to know what’s going on – what a perfect time to share your job hunting status! Also, a couple of posts on your social media accounts could bring in opportunities as well. Just be careful not to let it take over or people will just tune you out.

Tip #3: don’t be afraid of Craigslist.

The first time I looked for a “real” job (aka full-time with benefits) I shied away from Craigslist at first. I figured the best leads would be on job listing sites – I mean, that’s what they’re set up for, right? While there were plenty of listings there, I actually found it to be quite challenging to navigate. The CEO of the company I was interning for at the time asked if I had tried Craigslist and I kind of cringed… “Craigslist? Isn’t that kind of shady?” But she assured me that she knew plenty of people who got great jobs out of it. Thank goodness I listened to her! I found a great job not long after and once again it was Craigslist that came through for me this time around.

Tip#4: scour job listings like a pro.

It’s always hard browsing job descriptions trying to figure out what is a good fit for you. I always choose one or two features that I really want to focus on and center my searches around that. With my most recent search, I wanted a company with a entrepreneurial vibe, so I searched terms like “startup” (and I believe that’s how I ultimately found the Craigslist post that led me to my job). When I was first starting out a few years ago, I wanted something related to “associate/assistant manager” so that’s what I searched for (and I came across the affiliate manager listing for the job I got). Hone in on what matters the most to you for your search and find terms related to that – don’t just think about job title or responsibilities, but consider the work environment and even things like travel opportunities.

Tip #5: evaluate what you already use and love.

I actually looked at a bunch of positions at companies that are a part of my normal routine – everything from the technology I use to the things I buy. Take a look at brands you already love and see what openings they may have. Chances are that at least a handful of these companies appeal to you not just because of the product or service you use from them, but because of their company philosophy and culture. These would be great places to look to advance your career! I know I got pretty excited about some of them. I even thought of what I could do for that organization that they weren’t necessarily hiring for. If you enjoy the brand enough, it’s definitely worth a try reaching out to their HR department pitching a role that you’d be perfect for. They may not even know they need you until you show them what you can bring to the table!

Tip #6: apply like it’s your job!

Finally, and very importantly is to be very dedicated to your search. Job hunting could easily be a full-time gig and if you put forth that much effort, you will be rewarded that much faster. For my first job I applied to a good 10-15 listings every weekday. For this latest job hunt I was a lot pickier, but still forced myself to find half a dozen promising leads I would pursue each day, focusing on getting out an application to at least one of those. As long as you continually have a pipeline of leads, you are giving yourself your best shot at finding a fabulous job ASAP. Be sure to take the time to research the company and write a thoughtful and custom cover letter for each. That’s your chance to truly stand out! I was contacted about the job I got because my cover letter was one of the most detailed that they had come across. My qualifications weren’t super strong but I sure did make up for it in effort!

And of course, remember to keep your head up and keep plowing on even when things are looking grim. I pushed through that dark period of my search and found a job that I couldn’t be happier with. It’s always going to be challenging trying to find a great job with promising career prospects, the pay you want, near your home, and the company culture that fits your style. I hope that my tips help you think about different ways to approach your job search. Good luck!


Disclaimer: I don’t know your individual situations so of course I can’t guarantee these methods will work for you. They’ve worked for me but your success rate and time may vary.

How to: not waste soap

laelene Posted in how to guides,Tags: , , , , , , ,
0

Don’t you hate when you get those little pieces of a soap bar that you can’t quite use but don’t want to waste? Well, hopefully you do or else you’re probably losing out on a lot of soap uses! So here I’ve compiled some ways that you can make the most of those broken pieces:

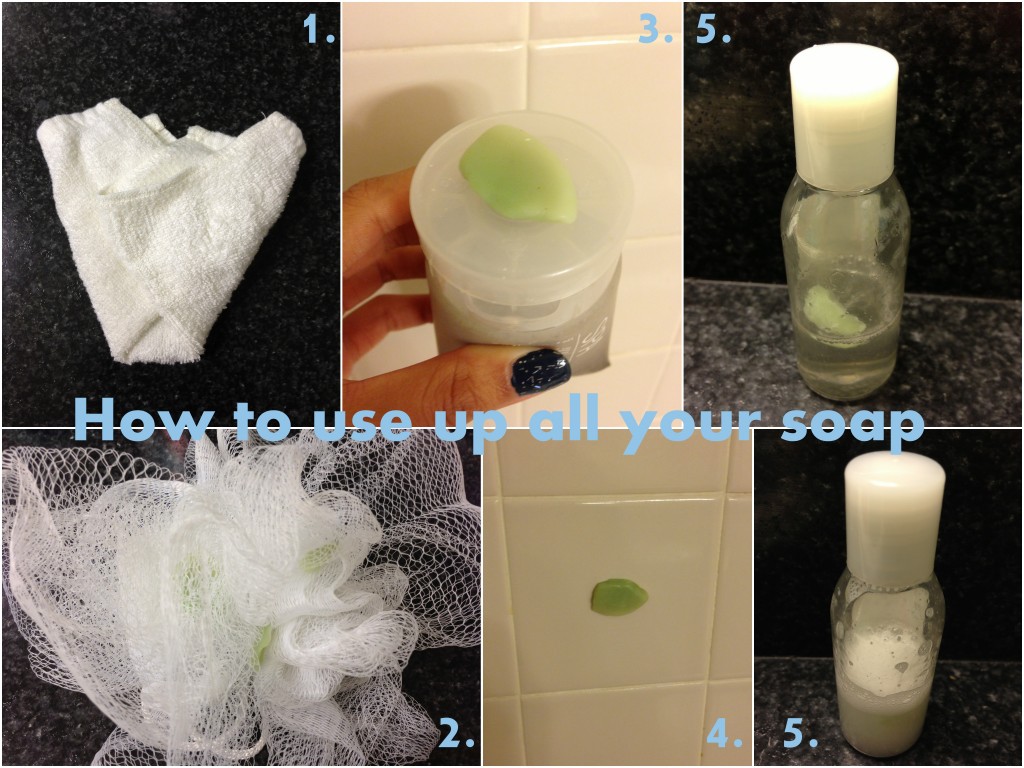
collage of various solutions to using up small broken pieces of soap

1. Put in cloth or bag

Fold it into a small facial cloth or cloth baggie, get the cloth/bag wet and then rub! Suds are able to make their way through the porous material and you might even get a better lather than usual. This way you also get some exfoliation out of it and the pieces don’t go down the drain.

2. Insert into loofah

Similar to the cloth, loofahs are great for exfoliation and improving lather, so if you’re into suds, stick those pieces in the center of your loofah and scrub away! It’s ideal if you can actually stuff them into a compartment where they won’t fall out, otherwise you might still struggle with small pieces falling through.

3. Stick to a cap

One of the greatest challenges I find with small pieces of soap is how thin and flimsy it is. I feel like I have nothing to grip on to, so by sticking it onto the cap of something, it gives you something to hold easily. Then just treat it like a tube of lip balm and rub around on your skin. It’s pretty similar to when you used the brand new bar, but of course with less material.

4. Adhere to wall

Ok, this one is probably the strangest suggestion I have, but hey it’s fun and hilarious. If you don’t have a cap to stick your soap to, just press it onto your shower tile. Then rub your hands or fingers on it when you need to use some! You’ll also help clean part of the wall that way… 😉

5. Shake in container

Finally (and probably least effective), you can throw those pieces into a plastic container, add a bit of water, and shake like crazy! You’ll get a watered down soapy mixture you can spray onto yourself if you have a nozzle or pour out to use like a super watery body wash. Alternatively, you can aim to just use the suds that you create as a foam cleanser.

So there you go! Never waste so much soap again with these 5 tips. 😛 It looks like I inadvertently ordered these in approximate from the most effective to the least effective method. Do you have anything to add?

Related Posts Plugin for WordPress, Blogger...