Posts Tagged ‘facebook’

How to: Create A Facebook Page

laelene Posted in how to guides,Tags: , , , , , , , ,
27

[Editor’s Note: This is an updated version of the original blog post that is now nearly three years old! This includes up-to-date instructions after some changes to Facebook’s interface.]

pinnable quote image for how to create a facebook page blog post on maryqin.com

I decided it was time for me to create a Facebook page for my little blog, so I can really try to build it out and maybe get some followers! I’d like to think that what I’m putting out there is educating or entertaining someone, but I’ve never really promoted it so it’s time to take action.

When I went to create the FB page, I (for the life of me) could NOT find where to choose the “Personal Blog” category! And that’s what spurred this entry. Read on to learn the basics for setting up a Facebook page and how to select a category like “Personal Blog,” “Personal Website,” and more!

Creating Your Facebook Page
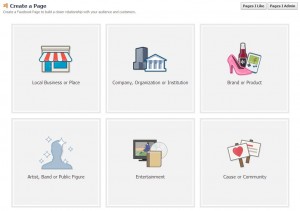
webpage to create a new facebook page First of all, here’s where you can create a new Facebook page. As you’ll see, right away they want you to choose a category. Your desired page may fit multiple categories, so it’s up to you to decide which one is best for your needs. Of the 6 types they’ve laid out for you (1. Local Business or Place; 2. Company, Organization or Institution; 3. Brand or Product; 4. Artist, Band or Public Figure; 5. Entertainment; 6. Cause or Community), all but the last one have a dropdown menu with category choices. Don’t worry if your desired category isn’t there – just pick what’s closest or tickles your fancy. In my case, I went for “Brand or Product”and chose “Website” from the dropdown.

You will be asked to enter your page name, which should be the title of your blog, the name of your business, or whatever you want the world to know your page by. Note that Facebook has certain rules in place about what is allowed in a name – for example, I tried to enter my blog name, ((little fat notebook)), but it was immediately rejected because I’m not allowed to use symbols. You are allowed one set of parentheses, but there can only be two words in it (like this) and obviously I’d have three if I went for (little fat notebook). Alas, I then tried just plain “little fat notebook” and that’s not allowed because the name must start with an uppercase! I didn’t like how Little fat notebook looked, so I went for the boring old Little Fat Notebook. Luckily, you can change it after the fact!

Setting Up Your Facebook Page

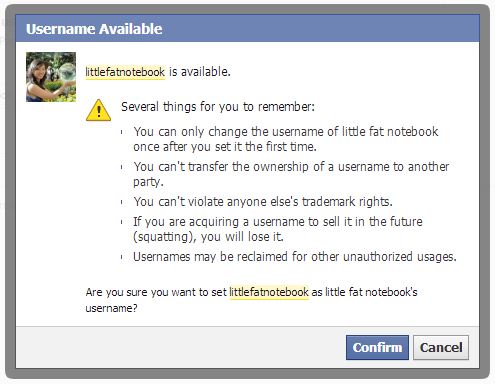
Once you agree to their terms and click Get Started, you’re prompted to fill in a description and add links to your site(s). They now allow you to choose your vanity URL (the pretty one that looks like https://www.facebook.com/littlefatnotebook instead of https://www.facebook.com/pages/little-fat-notebook/457453117668145). Check out my post on claiming vanity URLs to learn more. Choose carefully, you can only ever change it once after that. Next upload an avatar/profile picture to represent your page.

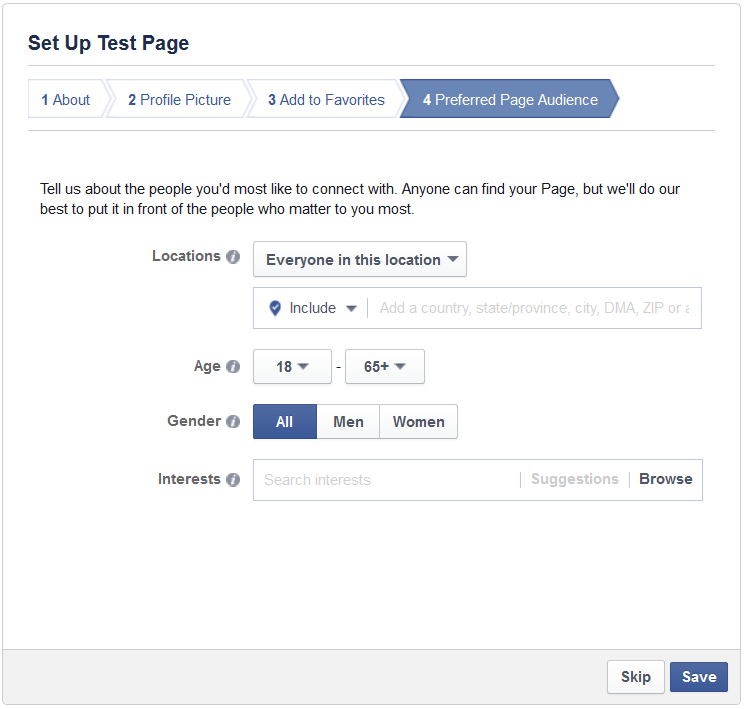
You can then add this new page to your Favorites area for quick access. That’s the part on the left when you go to Facebook.com. Finally, you can indicate your target audience including where they’re located, what age range they’re in, their gender, and their indicated interests. You’ll then be taken to your brand new Facebook page! A quick tour is given and then you’re given free reign. Feel free to add a cover photo, invite friends to like your page, and share your very first post!

area to set up target audience of new facebook page

Changing To A Better Category

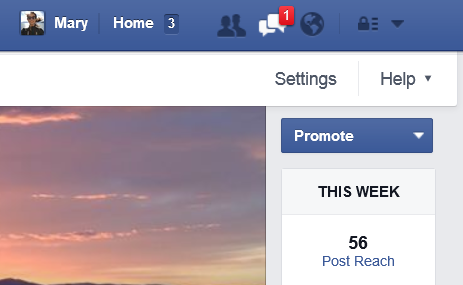
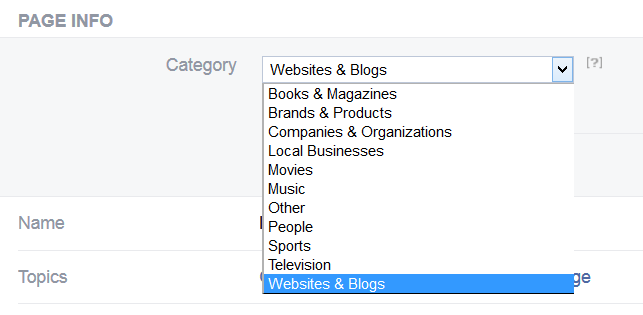
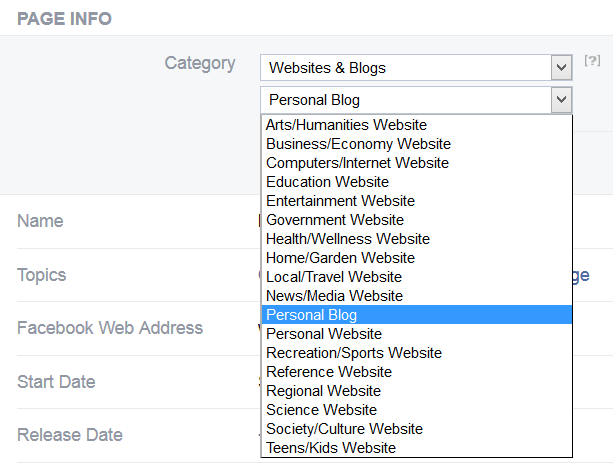
settings option for facebook pageNow here’s what you’ve been waiting for: how to make the page exactly as you want it! Under the cover photo area, click About. This takes you to Page Info where you’ll see the category you chose. Alternatively, at the top right, you’ll see Settings, which takes you to a page full of them. Along the left is a menu with “Page Info” – that brings you to the same place. Hover over the Category section to find the Edit button. From there you’ll see that the category and subcategory choices are far more plentiful than they let on earlier in the process! That’s where I found a previously unmentioned category called “Websites & Blogs,” which contains the subcategory option I had been hunting for: Personal Blog. The nice thing is that you can change this at any time, so as your site/brand evolves, you can update the category accordingly.page info section of facebook page

dropdown menu to edit facebook page category

dropdown menu to edit facebook page subcategory

So there you go! I hope that helped. If you found it useful, please like my page to show your support. 🙂

A few other tips:

When you reach 30 fans, Facebook will provide “insights” about your page, which include data about the reach of your page and each post (how many people see it, pretty much), how many people are talking about (sharing) your posts, and how many posts you’re putting up daily. You can also find cool demographic information about your followers. Basically if you’re into data, you’re going to love this part.

Note that I was able to update my page name from Little Fat Notebook to all lowercase. Unfortunately you still can’t add symbols, but as mentioned before, you can use one set of parentheses.

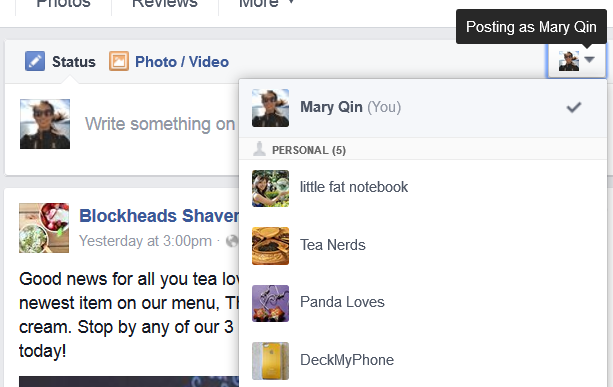
From now on, you can choose to interact with Facebook as yourself (personal profile) or your Page. This option is available for anything public that multiple profiles can access. You won’t see it for posts related to your private friends, for example, since Pages cannot post to personal profiles. But on other pages, you can choose to comment/like as yourself or your Page.

dropdown menu to choose facebook profile or page to interact as

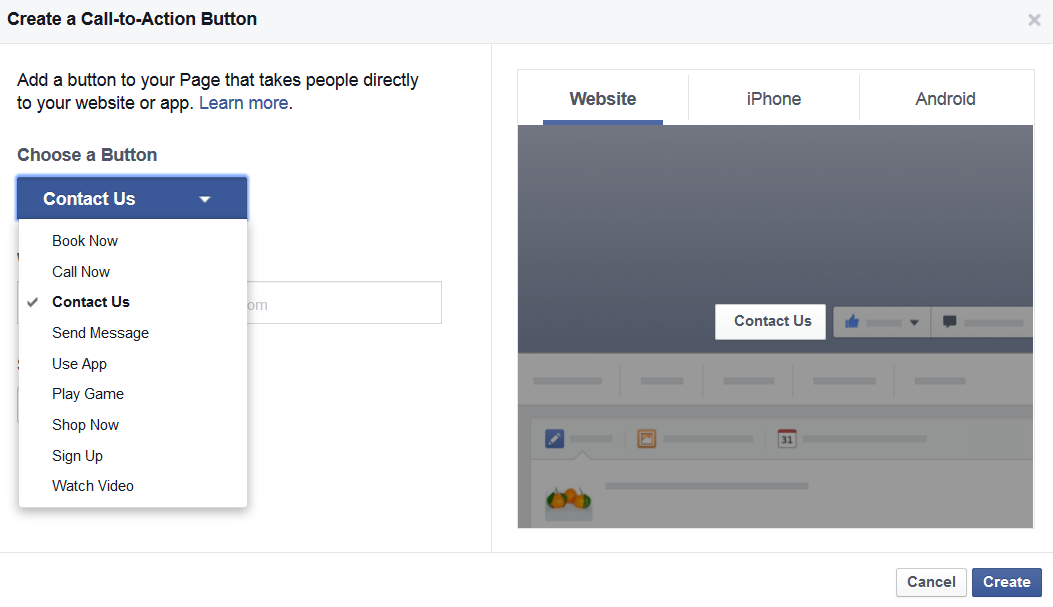
I used to highly recommend putting your website URL in the Short Description so users can easily click to your site from your FB page. Now Facebook has added a Call to Action button instead, so you can set that up to get users to your site. None of the options are particularly blog-friendly though, so I’d like to see a “Read More” or “Read Now” action.

dropdown menu to set facebook page call to action button

Now that you have a Facebook page, check out my tutorials on:
~how to manage your Facebook page
~how to link your social media accounts
~how to claim your vanity URLs (as mentioned earlier in the post), and more!

You can find all my “how to” posts for useful tips like how to make a favicon and random things like how to set your iPhone/iPad to stop playing music at a certain time or even how to win a Facebook contest!

If you have any questions or tips of your own, I’d love to hear them! Please do share. 🙂
When a trip to NYC becomes so much more

laelene Posted in general blog,Tags: , , , , , , , , , , , , ,
0

I should have known a weekend trip to New York could be so much more. As it was, this was set to be an awesome long weekend: Panda and I would spend a day going through my old town of Brewster, then spend a day in the city before heading home on the third day to settle back in for a shortened work week. I was really excited to revisit the areas of my early teens, from Westchester to Putnam counties. It was also a chance for me to share a bit of my childhood with Panda. We were both looking forward to exploring New York City together for the first time – this was my first long weekend since starting work and I wanted to make the best of it (and we most certainly did)!

posing on bright yellow street art sculpture in park in nyc

Don’t just have fun – document it and share it and tag it! Friends might just come knocking.

I’ll share more about the trip another time. What really struck me about this experience was when I posted a few items to my various social media channels. Something completely unexpected happened again and again: my friends in the area began reaching out to say they were nearby! This is exactly what social media is great for, encouraging connections that otherwise would have been easily missed. There were my Singaporean friends and former coworkers who messaged me that they were in the city for one more day before returning home. There was the Yelp comments from my college friend who lived in my building one year and was now in grad out in New Jersey. Then there was the Instagram conversation I had with another college friend, who did Orientation with me (and Panda) and was now doing her residency in Jersey. I mean, I knew I had friends out in the region, but it hadn’t occurred to me who I might be able to meet up with on our trip!

Each of them reached out to me on a social media channel last night and I messaged all of them through those different channels. Funny how they all found me through a different site/app! By this morning, I had arranged to meet with my grad school friend (Shadow) and the Singaporean coworkers (Starfish and Zen). Shadow met us at our hotel in Secaucus, where we had breakfast together. Panda knew her from when we hung out in college, so it was nice for the three of us to catch up and meet up so far from UCLA. I had thought she was still doing Teach For America, but she’s already well into her first year of a grad program! After she left, Panda and I headed into the city to meet up with Starfish and Zen at the MOMA. It was really nice to be able to introduce them to each other, since I talk about them here and there and now Panda has a better impression of who they are. We hung out for about an hour before splitting ways – they were off to a lunch meeting and we were due to head home.

I’m really glad I was able to get those two brief encounters with people I love seeing. Too bad Opti, my optometrist residency friend couldn’t meet up as well… that would have rounded things out nicely. Still, it’s great to know that next time I head up north I’ve got some friends to hang out with. And to think, it was all because I shared bits of my life on Facebook, Instagram, and Yelp! I guess next time I can do a better job of letting friends know my plans, since I probably could have met with a bunch more had they known.

365great Day 241: pictures

laelene Posted in general blog,Tags: , , , , ,
0

365great challenge day 241: picturesI’m a photo addict. I admit it. Ever since I got my first camera when I was 11 or 12, I’ve enjoyed capturing pictures. When I got my first digital camera, I was thrilled beyond belief – I no longer had to worry about choosing what to take pictures of carefully and I could just snap away, then delete later! In high school and college, you’d be hard-pressed to find me unprepared without a camera on me whenever I went out. With the emergence of Facebook, it became a way for me to connect with my friends even more, since every time I tagged them they’d get notified and it could be a conversation starter. Pictures are such a wonderful way to remind yourself a moment, a memory, a feeling that you may have forgotten about otherwise. It’s also a useful way to be able to share those memories more accurately with your loved ones. Seeing you when you were younger creates a deeper connection than trying to imagine it. I always love both taking pictures and having my picture taken, because of the memories I know I’ll have when I look back. It’s a great way to document all sorts of things!

365great Day 198: Facebook debugger

laelene Posted in 365great,Tags: , , , , , ,
0

365great challenge day 198: facebook debuggerOk, this is probably something most people have no need for nor care about, but for my purposes, I’ve found it to be a useful tool. Facebook’s debugger detects any errors that may be on a page, which makes it easy to see what might need fixing. This is really helpful when, say, a blogger wants to post a link to their blog post but the image isn’t being pulled correctly. A quick check on this site can pinpoint the issue (or at least eliminate other factors) without having to trudge through the code trying to figure it out. It’s simple and provides a service that really eases a pain for those of us who have to deal with it. Great way to enhance our operations and save time and hassle.

365great Day 146: Facebook

laelene Posted in 365great,Tags: , , , , , , ,
0

Learn more about 365great here.

365great challenge day 146: facebookThe social media network that started it all. I remember back in 2004, I was getting ready to start college in the fall and there was this new thing called The Facebook trending. I ignored it at first, figuring it to be some silly fad, but when I got an invitation from a friend of mine who doesn’t do frivolous things, I decided to give it a chance. Before I knew it, I had found (and messaged) a ton of people set to take the same classes as me in fall quarter. Some of them replied and we struck up a friendship in the lonely month before school started when all my other friends had already started at their universities. UCLA is one of the last, if not the last school system to start up. From there, I started finding old friends from many of the other states I’d lived in, including childhood best friends all grown up. I loved Facebook for that, since when I was younger, every move meant losing contact with my entire social network. Back then it was either pay for long distance phone calls or write letters… so of course we did none of that – too expensive and too much effort! Over the years, my use of it has evolved from making sure I didn’t lose track of acquaintances to sharing all kinds of fun pictures. It’s nice that I can check in on friends at my leisure and get an idea of what they’re up to. For keeping us connected without constant effort, I value Facebook and it has always been my favorite social media site. It connected me back to a childhood I’d lost! Isn’t that great?

How to: Manage Facebook Pages

laelene Posted in how to guides,Tags: , , , , , , , , , , , ,
6

First on the agenda: using the correct “voice”

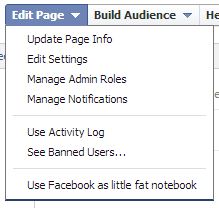
facebook voice use as page dropdown menu choiceWhenever you are on Facebook interacting with content, you have the choice to use your personal profile or one of your Facebook pages. By default, you use your personal voice whenever you’re on people’s profile pages or business pages and you use your Facebook page voice whenever you’re on your own Facebook page managing it.For example, when I go to http://facebook.com/littlefatnotebook, if I like or comment on something, it shows as littlefatnotebook doing that action whereas if I go to some other business’s page and comment, it shows a comment from my personal Mary Qin account. If you want to comment as your page, then go first to your Facebook page and click the “Edit Page” dropdown menu. The last option, “Use Facebook as” is what you want. Now if you navigate away from your page, you will find that it preserves that setting and won’t switch to your personal profile as it normally would. Along the top bar, you can see which voice you’re in.

Getting more likes with exclusive content

To get more likes you could always run an ad or hold a giveaway, but if you want to up the ante for free, try setting up a tab with exclusive content, which can only be unlocked if people like your page. I’m sure you’ve seen plenty of bigger brands doing this (though they mostly do it for giveaways). “Like us to enter!” they say. For the technical details on how to create locked content, check out Kira’s tutorial. You can get creative with what you offer and a lot of it depends on your brand. If you’re a blogger, you can include a list of resources for free stuff. If you sell things, you can include a special discount code. If you’re a musician, you can include a free download for your latest track. You get the idea!

Using the Facebook Pages app

Facebook created a Pages app that you can download for free to your mobile device. This makes it much easier to manage your pages on the go and it allows you to check out the Insights for your page. This also shows you notifications for your pages so you can tell whether there’s been action there lately. It’s a nice little app to keep handy!

Bringing out “posts by others” into your stream/timeline

facebook posts by others allowed on page

Have you ever noticed that when visitors comment on your page, it gets relegated to a tiny box on the side called “Recent Posts by Others” that is barely visible? Well, if you want any particular post to show up in your timeline, go to your page and choose Edit Page>>Use Activity Log. Find the post that you want bring out into your timeline stream and click on the little pencil icon on the right to edit. You can choose “Allowed on Page” or “Highlighted on Page” to have it show up mixed in with your posts. Highlighting it will just make the box bigger and more obvious in your timeline. Of course you can also choose to hide any post as well.

Have fans set up “Get Notifications” for better visibility

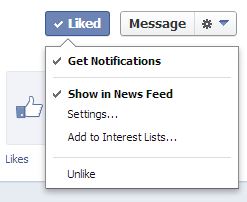
facebook liked button get notifications optionIt’s hard to get people’s attention in the vast sea of posts being added to Facebook every day. You can encourage fans to get your updates by scrolling over the Liked button on your page and checking “Get Notifications.” This will ensure your posts don’t get overlooked as often and will count towards the total notifications that person gets, so each update on your page is shared with them. Facebook actually doesn’t show everyone everything in the news feed, so your updates may never get much visibility otherwise.

Using Facebook Debugger for posts

Facebook Debugger is such a neat tool for those of you who may want to dig deeper into the details of your posts. If you’ve ever found that an image is not being pulled when you try to share a link to your page, you can come use the debugger to figure out why. If any errors are found on your page, you’ll see yellow boxes outlining the issue. Maybe the image was too small or you just updated it and you need Facebook to pull the new data, but it hasn’t updated yet. Try doing a hard refresh (press Ctrl+F5) and see if that fixes it.

Networked Blogs & similar auto posting programs

If you’re a blogger, you probably want your posts updated to your Facebook (and Twitter) feeds but you don’t want to manually do it every time. That’s just extra work, as if blogging wasn’t time-consuming enough! You can easily set up automated posts with Networked Blogs, dlvr.it, or RSS Graffiti. I tested these and found that Networked Blogs worked best for me because it can pull an image when there’s only a video in the post, whereas the others either have no image or pull my picture from the sidebar. Additionally, Networked Blogs allows me to manually publish a post in case I needed to do that and I’m picky enough about my posts that I sometimes have to edit the post. Some of the others only publish when a new post is up and don’t allow you to republish manually. You can also use these to set up updates to your Twitter feed so you don’t have to worry about promoting new blog posts there either!

Setting up featured likes

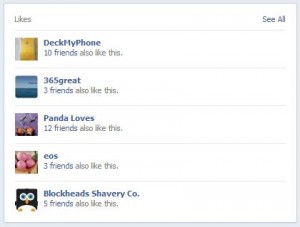
facebook page likesOn the right side of your page’s timeline, you will find a “Likes” box that showcases some of the other pages that your page has liked. These will rotate randomly unless you choose to feature certain likes. To do that, go to your page and navigate to Edit Page>>Edit Settings>>More…>>Featured. Here you’ll see the option to Edit Featured Likes (up to 5). The ones you choose will always show up in that list on your page. If you look at mine shown to the left, the first three are featured likes that always remain the same. The last two continue to change randomly each time someone loads the page.


So those are some of the random tips I have for managing Facebook pages and getting the most out of them! Do you have any tips to share?

Sunday Social: blogging beginnings

laelene Posted in general blog,Tags: , , , , , , ,
4

Sunday Social
1. How did you come up with your blog name?

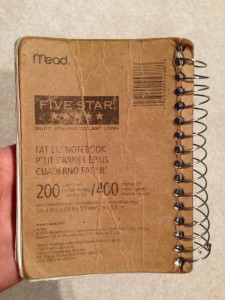
back of worn mead five star fat lil notebook

A well-worn notebook I’m currently using.

In middle school, I was looking for a small notebook that could fit in a purse, yet hold a ton of information. When I found Mead’s Five Star Fat Lil’ Notebook, it was perfect. The size of the pages is just right, it has a TON of sheets (200 to be exact), and the pages are perforated so I can tear them out when I’m done. I had one with me everywhere so I could write down things I wanted to remember. When I started blogging, I had pages filled with potential blog post ideas – the ‘fat lil notebook’ was vital to my blogging! I didn’t want to take the name exactly, so I changed it to “little fat notebook” and decided to add the double parentheses to make it visually a bit “fat.” I like to be different and I’ve never seen another blog with double parentheses. This also doesn’t limit me to any topic or type of blogging so I can write as I please. 🙂

2. What is your favorite thing about blogging?
I love sharing! Whether it’s a how-to (my most popular post to date is about setting up a Facebook page), a review/product feature, or just random thoughts, I like to share it with others. I think people like to know they’re not alone in things, so if you write about it, they’ll know at least one other person agrees/has experienced that too. I wish more people commented so I could get feedback on what they like to see on the blog.

3. What is one thing you have discovered because of blogging and now can’t live without?
It’s gotta be a tie between subscription boxes (which I learned from other bloggers) and getting free stuff to try (which I get to do partly because I have a blog). I absolutely love subscription boxes and I have quite a list of ones I want to try in the coming years. Right now a lot of it is focused on beauty and personal items, but I see my preferences changing towards household stuff once we get a place, then towards pampering again come wedding prep time, then a shift to baby and kid-oriented things as we start a family. Also, I’ve only recently discovered BzzAgent, Influenster, Pink Panel, and other similar sites that send me free things to test! It’s great and I definitely want to keep it going indefinitely (as long as I qualify for the stuff).

4. Facebook or Twitter? And why?
Facebook. I’m never on Twitter and pretty much only use it to promote my blog posts and enter giveaways. That’s it. Facebook, on the other hand, is where I can share pictures with my friends, get invited to events, interact with brands, etc. It feels less “busy” on that site because I can control the level of interaction. Twitter has way too many strangers trying to sell things or get followers or whatever. I pretty much just ignore it.

5. If one celeb read your blog who would you want it to be?
Umm… I don’t really know or care for celebrities, but maybe Ellen or Oprah since they could talk about my blog and hopefully that would bring more readers! Yeah, I know, totally selfish, but celebrities just aren’t my thing so if one did read my blog, might as well be one who can help me grow! I’d love to be able to share more things with more people and learn from them too, but it’s hard to do that when there aren’t many readers connecting. *hint* 😉

6. What is something you want people to know about your blog?
It is constantly evolving and I’m always looking for feedback on what you want to see! I seem to get a lot of lurkers and I’d really love to hear from you. 🙂 I mean, yeah I blog about what I want, but I want to also make sure I’m covering what YOU want! Please do share. It would make my day!

How to: Claim Your Username and Vanity URLs

laelene Posted in how to guides,Tags: , , , , , , , , , , , ,
7
Ever want to claim “facebook.com/yourbrand” only to find it was taken? Rather than accepting that and settling for something like “facebook.com/yourbrand123″ (which is less than optimal), read on to learn how you might be able to get what is rightfully* yours.

First let me start by saying that most sites already use vanity URLs, so whichever username you choose will usually end up being in your URL. For example:

http://twitter.com/maryqin
http://pinterest.com/maryqin
http://instagram.com/laelene

For these sites, the issue of the getting the vanity URL you want ends up being the same as getting the username you want. Once you get the username, you get the associated URL.

Now Facebook is an exception to this and you actually have to set the vanity URL yourself. They start you off with some ugly URL like http://www.facebook.com/pages/little-fat-notebook/457453117668145. Just go to the username settings page to change it to something pretty like http://www.facebook.com/littlefatnotebook. You can do this for your personal profile as well as any Facebook pages you manage. The cool thing is that usually you have to wait until you have 25 fans on a page before you can set the username, but by doing it this way you bypass that requirement! [Edit: Looks like there still might be a minimum – I was able to set the username with just 16 fans but I can’t for another page that only has 4 fans right now.]

facebook page set username

facebook page set username confirmation

Ok, so let’s say you’re claiming these usernames for your brand and you find someone has already taken them. You may not have to resort to choosing a different username – there’s an option to try to claim the username by reporting trademark infringement. A few tips for improving your chances of filing a successful claim:

1. You should own the domain name related to the username you want. For example, I own pandaloves.com and I wanted facebook.com/pandaloves and twitter.com/pandaloves

2. Even better if you actually own the trademark for the name in question, but it’s not necessary. If you do own it, make sure you can prove it to help your case. I never registered a trademark for my brand’s name, Panda Loves, but that was fine.

3. If you do own the domain (i.e., pandaloves.com), use an email set up from that domain for more credibility. This shows that you are an authorized representative of the business. I used contact@pandaloves.com as my contact email when I filled out the form.

I came across this helpful article for claiming usernames on Facebook and Twitter, which you should read if you are claiming a username on either site. I was able to successfully claim both usernames on Facebook and Twitter, but not Pinterest (they never got back to me). I haven’t tried for other sites.

For Facebook, go here to fill out the form: https://www.facebook.com/help/contact/208282075858952

For Twitter, there are two routes you can take depending on if you own the trademark:

https://support.twitter.com/forms/impersonation (if you don’t own the trademark)
https://support.twitter.com/forms/trademark (if you do own the trademark and have proof)

And for other sites, I located articles that can help with the claim process. For any site not listed, do a search in their help section for terms like “trademark infringement” or even “impersonation” to locate more information.

Pinteresthttp://about.pinterest.com/trademark/
YouTube: http://support.google.com/youtube/bin/answer.py?hl=en&answer=151655
Etsyhttp://www.etsy.com/help/article/17
Instagramhttp://help.instagram.com/customer/portal/articles/118970-trademark-policy-for-instagram-usernames

Let me know if you have any further questions or how it goes when you do file your claim on these sites! Good luck!


*This is, of course, assuming that it is your right: that you are trying to claim the name of a brand you own and not take someone else’s.

How to: Create A Facebook Page (original)

laelene Posted in how to guides,Tags: , , , , , , , ,
104

pinnable quote image for how to create a facebook page blog post on maryqin.com

I decided it was time for me to create a Facebook page for my little blog, so I can really try to build it out and maybe get some followers! I’d like to think that what I’m putting out there is educating or entertaining someone, but I’ve never really promoted it so it’s time to take action.

When I went to create the FB page, I (for the life of me) could NOT find where to choose the “Personal Blog” category! And that’s what spurred this entry. Read on to learn the basics for setting up a Facebook page and how to select a category like “Personal Blog,” “Personal Website,” and more!

Creating Your Facebook Page

webpage to create a new facebook page First of all, here’s where you can create a new Facebook page. As you’ll see, right away they want you to choose a category. Your desired page may fit multiple categories, so it’s up to you to decide which one is best for your needs. Of the 6 types they’ve laid out for you (1. Local Business or Place; 2. Company, Organization or Institution; 3. Brand or Product; 4. Artist, Band or Public Figure; 5. Entertainment; 6. Cause or Community), all but the last one have a dropdown menu with category choices. Don’t worry if your desired category isn’t there – just pick what’s closest or tickles your fancy. In my case, I went for “Brand or Product”and chose “Website” from the dropdown.

You will be asked to enter your page name, which should be the title of your blog, the name of your business, or whatever you want the world to know your page by. Note that Facebook has certain rules in place about what is allowed in a name – for example, I tried to enter my blog name, ((little fat notebook)), but it was immediately rejected because I’m not allowed to use symbols. You are allowed one set of parentheses, but there can only be two words in it (like this) and obviously I’d have three if I went for (little fat notebook). Alas, I then tried just plain little fat notebook and that’s not allowed because the name must start with an uppercase! I didn’t like how Little fat notebook looked, so I went for the boring old Little Fat Notebook. Luckily, you can change it after the fact!

Setting Up Your Facebook Page

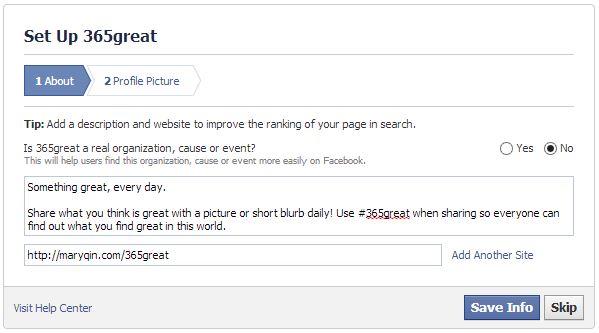
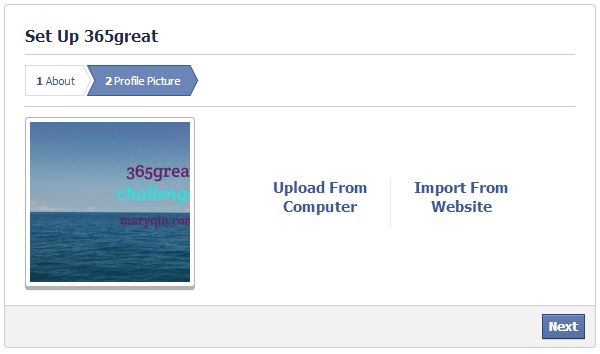
Once you agree to their terms and click Get Started, you’re prompted to fill in a description and add links to your site(s). Next upload an avatar/profile picture to represent your page. You’ll then be taken to your brand new Facebook page! A quick 3-step tour is given and then you’re given free reign. Feel free to add a cover photo, invite friends to like your page, and share your very first post!

screenshot of page to set up about section of new facebook page

Adding a basic description.

uploading profile picture to new facebook page

Uploading a profile picture.

Changing To A Better Category

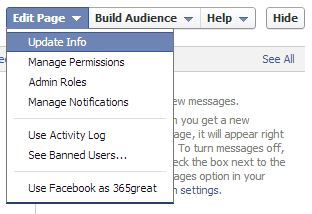
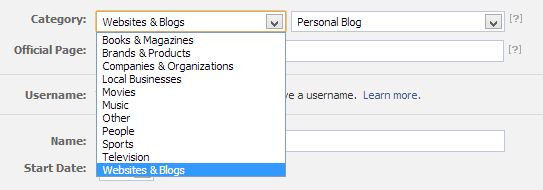
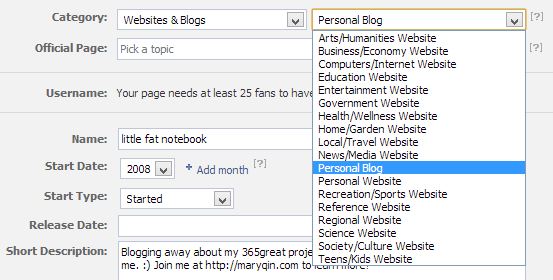
dropdown menu to edit facebook page infoNow here’s what you’ve been waiting for: how to make the page exactly as you want it! At the top, you’ll see an option to Edit Page, with a dropdown. The first option is what you want: “Update Info.” Here you’ll see that the category and subcategory choices are far more plentiful than they let on earlier in the process! That’s where I found a previously unmentioned category called “Websites & Blogs,” which contains the subcategory option I had been hunting for: Personal Blog. The nice thing is that you can change this at any time, so as your site/brand evolves, you can update the category accordingly.

dropdown menu for facebook page categories


dropdown menu for facebook page subcategories


A few other tips:

Once you get 25 fans, you can reserve a vanity URL (or username, as Facebook calls it). This means that rather than an ugly URL like https://www.facebook.com/pages/little-fat-notebook/457453117668145, you can get a pretty one like https://www.facebook.com/littlefatnotebook, which is much easier to direct fans to. I still need to claim mine! (So hey if you don’t mind, please like my page so I can claim my vanity URL soon!) [Update: I was actually able to claim it when I had just 16 fans – check out my post on claiming vanity URLs to see how.]

When you reach 30 fans, Facebook will provide “insights” about your page, which includes data about the reach of your page and each post (how many people see it, pretty much), how many people are talking about (sharing) your posts, and how many posts you’re putting up daily.

Also note that I was able to update my page name from Little Fat Notebook to all lowercase. Unfortunately you still can’t add symbols, but as mentioned before, you can use one set of parentheses.

I highly recommend putting your website URL in the Short Description so users can easily click to your site from your FB page. Just be sure to input the “http://” so it becomes a clickable link, as shown. (Click for full size.)

screenshot of facebook page short description with embedded link

Now that you have a Facebook page, check out my tutorials on:
~how to manage your Facebook page
~how to link your social media accounts
~how to claim your vanity URLs, and more!

You can find all my “how to” posts for useful tips like how to make a favicon and random things like how to set your iPhone/iPad to stop playing music at a certain time or even how to win a Facebook contest!

If you have any questions or tips of your own, I’d love to hear them! Please do share. 🙂
How to: Facebook Contest Tutorial

laelene Posted in how to guides,Tags: , , , , , , ,
1

I just participated in a super-quick giveaway on Facebook and there seemed to be a lot of confusion over how to win. In case you ever come across a similar promo, here are some tips for a winning strategy – I’ll use the contest I entered, hosted by Physician’s Formula, as the example.

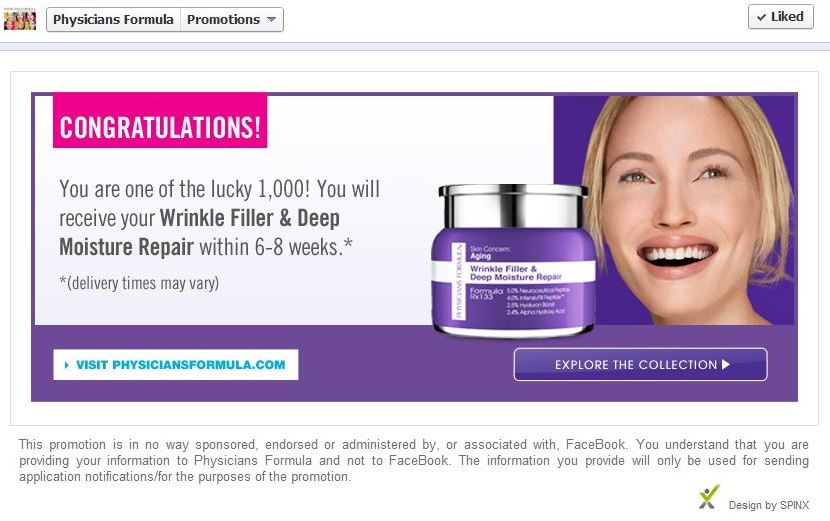
success page for those who got the free physician's formula product on facebook

Want to win these giveaways? Here are my tips for how to do it.

The giveaway was hosted on Physician’s Formula’s Facebook page using the “Promotions” tab. On the promo tab, there was a timer counting down to when the giveaway started, which in this case was today at 2 PM PST.

Tip 1: Check the time! A lot of people thought it was 2 PM local time, but it was stated that it would be PST, so you’d need to convert to your own time zone. All giveaways will specify the time, so be sure to look it up. If you’re not sure, browse the Rules or Terms/Conditions for the contest ahead of time, or just check with the company by asking them.

The instructions were to watch for a secret word posted on their page at 2 PM PST, then be one of the first 1000 to fill out the form (over on the Promotions tab) to win. A lot of people promptly posted the secret word on PF’s Facebook page and wondered if they won. This, however, was not the appropriate place to enter. A careful read of their instructions would have made it more clear.

Tip 2: Double & triple-check the rules! All giveaways clearly lay out how they will work and what their terms are, so if you really want to win, make sure you know exactly what you need to do when the giveaway is live.

Also, many people complained that the timer wasn’t accurate or their clock didn’t match. One of the things you want to check beforehand is that your clock is synced with the “real” time. Usually our computers do this automatically, but it’s always good to check it and make sure that your clock is matching up with the timer. As for the timer being off, it might have been due to certain browsers not being up to par. Make sure you’re using the latest version of your browser. Also, when time’s getting close, refresh the page so the servers realign and ensure a more accurate countdown time.

Tip 3: Refresh the page (but not too much). It’s always a good idea to refresh the page to make sure you haven’t missed something, but overdoing it can overload the system and cause your page to freeze mid-load or load blank. Definitely not what you want when you’re trying to win!

Oh, and speaking of all this browser and computer talk – if at all avoidable, DO NOT USE a smartphone. Facebook “apps” (or tabs) such as the Promotions one for Physician’s Formula don’t tend to work on mobile phones. Your best bet is a computer browser, whether desktop or laptop or netbook or otherwise.

Tip 4: Use a non-mobile device. While you still can access the appropriate tab on a tablet, it’s a lot more hassle and often less reliable than a good old computer desktop or laptop. If you don’t have access to a non-mobile device but you have a tablet, be sure to log in to Facebook from the browser. Don’t use the Facebook app for your device, as it will generally not show you the Promo tab.

Ok, so you’re all ready to wait for the secret code to show up on the Facebook page so you can then fill out the form on the Promotions tab. Be smart about it! Have both pages open in your browser! In fact, have an extra backup browser with the pages open too. That way, you can quickly get to the form once it’s live and fill it out ASAP. If there’s a snag with something loading, you can promptly try a different browser to see if it works better.

Tip 5: Have both pages open in your browser. Saves a little bit of time, which can mean the difference between winning and not.

Ok, and now here’s one of my best tips: get notifications. What does that mean? Well, read on…

Tip 6: Get notifications! Usually to participate in a contest like this, you have to “Like” the page. Now what a lot of people don’t know is that after you like the page, you can actually choose to get (near) instant notifications from that particular brand. Just hover over the “Like” button and you’ll see a small menu. Click on “Get Notifications” and a checkmark will appear next to it. Now you’re a power user! This one step can help so much – every time the page is updated, you will get a notification. When you have Facebook open in your browser, a small box will appear in the corner sort of like an IM. If you have a mobile device, it will also receive pop-up notifications (if you have that enabled for your Facebook app). This is the fastest way to find out if the company updated their page yet, so you can get the code right away.

If this is confusing, just give it a try with a page you follow that updates often. The next time they post, you’ll get a notification and you’ll see how fast it is. When the code showed up for Physician’s Formula today, I saw it pop up in the corner and immediately went to fill out the form on the Promotions tab (which was live by then – no refreshing needed). When you went to fill out the form, a small box popped up asking for the secret code and that’s where you should have entered it. Tons of people repeated the code on the wall, but that didn’t do anything for you. And if you were one of the lucky 1000 to get your submission in on time, you got a lovely confirmation like the one shown. All those wondering if they got it probably didn’t, since it was clear upon filling out the form if you did.

Alright, those are my tips for how to best prepare yourself to win these flash giveaways! Do you have any other tips to share? Did you find this useful? Please let me know!

If you liked this, you might like my other tutorial on how to link social media accounts.

Related Posts Plugin for WordPress, Blogger...