I decided it was time for me to create a Facebook page for my little blog, so I can really try to build it out and maybe get some followers! I’d like to think that what I’m putting out there is educating or entertaining someone, but I’ve never really promoted it so it’s time to take action.
When I went to create the FB page, I (for the life of me) could NOT find where to choose the “Personal Blog” category! And that’s what spurred this entry. Read on to learn the basics for setting up a Facebook page and how to select a category like “Personal Blog,” “Personal Website,” and more!
Creating Your Facebook Page
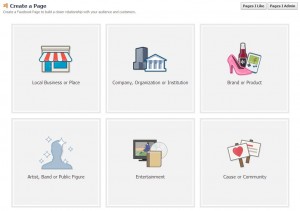 First of all, here’s where you can create a new Facebook page. As you’ll see, right away they want you to choose a category. Your desired page may fit multiple categories, so it’s up to you to decide which one is best for your needs. Of the 6 types they’ve laid out for you (1. Local Business or Place; 2. Company, Organization or Institution; 3. Brand or Product; 4. Artist, Band or Public Figure; 5. Entertainment; 6. Cause or Community), all but the last one have a dropdown menu with category choices. Don’t worry if your desired category isn’t there – just pick what’s closest or tickles your fancy. In my case, I went for “Brand or Product”and chose “Website” from the dropdown.
You will be asked to enter your page name, which should be the title of your blog, the name of your business, or whatever you want the world to know your page by. Note that Facebook has certain rules in place about what is allowed in a name – for example, I tried to enter my blog name, ((little fat notebook)), but it was immediately rejected because I’m not allowed to use symbols. You are allowed one set of parentheses, but there can only be two words in it (like this) and obviously I’d have three if I went for (little fat notebook). Alas, I then tried just plain little fat notebook and that’s not allowed because the name must start with an uppercase! I didn’t like how Little fat notebook looked, so I went for the boring old Little Fat Notebook. Luckily, you can change it after the fact!
Setting Up Your Facebook Page
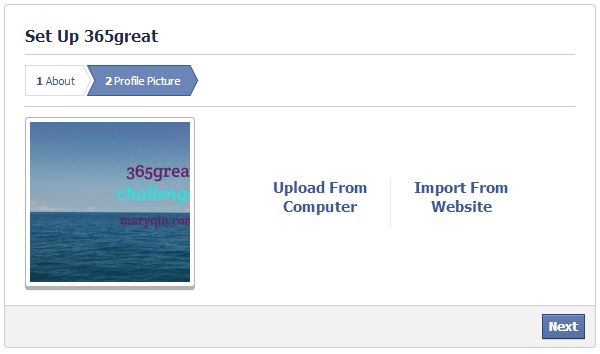
Once you agree to their terms and click Get Started, you’re prompted to fill in a description and add links to your site(s). Next upload an avatar/profile picture to represent your page. You’ll then be taken to your brand new Facebook page! A quick 3-step tour is given and then you’re given free reign. Feel free to add a cover photo, invite friends to like your page, and share your very first post!
Changing To A Better Category
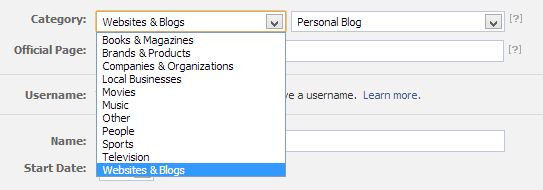
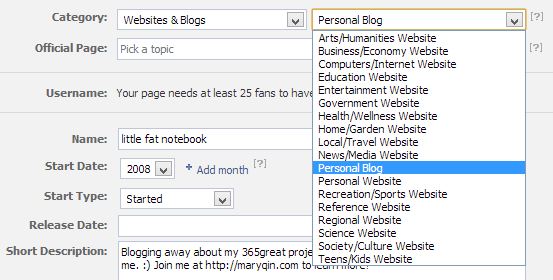
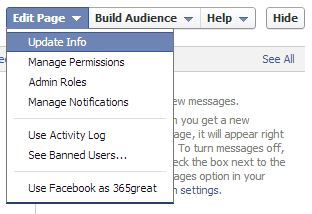 Now here’s what you’ve been waiting for: how to make the page exactly as you want it! At the top, you’ll see an option to Edit Page, with a dropdown. The first option is what you want: “Update Info.” Here you’ll see that the category and subcategory choices are far more plentiful than they let on earlier in the process! That’s where I found a previously unmentioned category called “Websites & Blogs,” which contains the subcategory option I had been hunting for: Personal Blog. The nice thing is that you can change this at any time, so as your site/brand evolves, you can update the category accordingly.
A few other tips:
Once you get 25 fans, you can reserve a vanity URL (or username, as Facebook calls it). This means that rather than an ugly URL like https://www.facebook.com/pages/little-fat-notebook/457453117668145, you can get a pretty one like https://www.facebook.com/littlefatnotebook, which is much easier to direct fans to. I still need to claim mine! (So hey if you don’t mind, please like my page so I can claim my vanity URL soon!) [Update: I was actually able to claim it when I had just 16 fans – check out my post on claiming vanity URLs to see how.]
When you reach 30 fans, Facebook will provide “insights” about your page, which includes data about the reach of your page and each post (how many people see it, pretty much), how many people are talking about (sharing) your posts, and how many posts you’re putting up daily.
Also note that I was able to update my page name from Little Fat Notebook to all lowercase. Unfortunately you still can’t add symbols, but as mentioned before, you can use one set of parentheses.
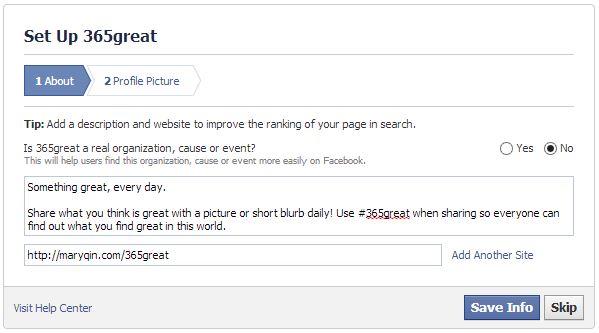
I highly recommend putting your website URL in the Short Description so users can easily click to your site from your FB page. Just be sure to input the “http://” so it becomes a clickable link, as shown. (Click for full size.)
Now that you have a Facebook page, check out my tutorials on:
~how to manage your Facebook page
~how to link your social media accounts
~how to claim your vanity URLs, and more!
You can find all my “how to” posts for useful tips like how to make a favicon and random things like how to set your iPhone/iPad to stop playing music at a certain time or even how to win a Facebook contest!
If you have any questions or tips of your own, I’d love to hear them! Please do share. 🙂


March 28, 2014 12:22 pm
Thanks for posting that! You’d think it would be a more accessible category!
April 9, 2014 5:26 am
This was very useful information! Thank you for posting. 🙂
chocolatefrosst recently posted..Tech Accessories
April 15, 2014 1:29 pm
You helped me out a lot with this post so thank you!
Take a look at my blog! naimariefleur.blogspot.com
April 16, 2014 10:10 pm
thank you this helped me 🙂
http://flightvintage.blogspot.com
carissa recently posted..GRAPHICS FROM BORACAY
April 26, 2014 12:04 pm
Big help! Thank you!
Jaye- Cardiff in a Tea Cup recently posted..A Visit to Waterloo Gardens Teahouse, Penylan
May 11, 2014 5:46 am
Thank you for sharing. A real big help. Thanks.
May 28, 2014 1:55 pm
Thanks for posting this – I’ve just been setting up my blog page and wouldn’t have been able to work out the categories without this!
Tin Box Traveller recently posted..Days out in historic East Sussex
June 3, 2014 12:10 pm
Thank you so much. Great help
Osy Osehie recently posted..Denim in summer
July 7, 2014 9:36 pm
This is sooooo helpful thank you!
I do have a question I’m wondering if you know the answer to….
Is there a way to link my personal blog Facebook page to my personal FB page? When people are on my personal page and click “about” (where it lists my workplace history) I would like my blog page to show up… Any ideas?
July 8, 2014 7:25 pm
Hi Katrina, glad I could help! You can certainly link back to your blog page in your “About” section by listing it in your work history. Go there to edit and it’ll ask you where you worked – start typing the name of your page and you should see it show up as an option. I’m not sure if it shows up right after you add the new page, so try waiting a few days if you don’t see it yet.
July 30, 2014 2:12 pm
Thanks so much for this information. The Facebook interface has changed a bit, but I was able to figure it out with your help.
Shannon recently posted..Just keep blogging, just keep blogging
August 30, 2014 12:55 pm
Thanks!! That was really helpful 🙂
September 4, 2014 5:58 pm
SOO Helpful!
Thank you!!
September 7, 2014 2:52 am
Thank you Thank you – I found this post on Google after pulling my hair out to try and find a Personal blog category and your post was the best and easiest to follow
September 7, 2014 8:10 pm
Thanks, I’m glad it was easier to follow!
October 2, 2014 12:52 am
Thank you! This was very helpful, great post.
October 11, 2014 5:40 pm
Hi 🙂 Thank you so much for this tutorial, I have been pulling my hair out for months trying to work this out. One concern though, in following your instruction I noticed that a page came up and mentioned $12 per day costs. I have back tracked and made a few changes so I’m hoping I won’t be charged. Is there any way to check if I have a “paying page” please? I will have to delete my “other” page if I have. Any help would be appreciated. I changed my category to “Other” and sub-category to “Just for Fun”. Cheers 🙂
November 8, 2014 11:19 am
THANK YOU!
Without you, I would NOT have been able to set up the page I wanted x
November 14, 2014 1:14 am
Thank yo so much for posting this, it’s been really really useful! 🙂 x
Tiny Tang recently posted..White and Blue + Cross The Line | lifeasapetite Outfit #16
November 14, 2014 1:15 am
Thank you so much for this post, it’s been so so useful!
Tiny Tang recently posted..White and Blue + Cross The Line | lifeasapetite Outfit #16
November 19, 2014 8:31 am
Hi!! i am going to be using Facebook for a forum to start up a personal blog about my families road trip we are currently on-i already have a personal Facebook page and was wondering what is the difference between creating a page under this one -and starting a whole new page under my blog name ? Any advice would be so helpful! Thank you so very much !!!
December 5, 2014 11:07 pm
Oh, thank you for this! I wish I had found it 7 years ago! I didn’t realize I could build a pro page for my blog, and of course this is what I SHOULD have done – but, like you I didn’t see the category. So, I built a regular personal profile for my blog instead. Today Facebook has disabled my account, stating I have to use my “real name”! I am frantically trying to get the account back but do not want to put my real name into their system because then it won’t be my blog name and it will be all confusing (and another name change is not allowed for 60 days). I would be more than happy to have it changed into a professional PAGE and not be a personal profile, but now that I am locked out, I just don’t know how to do it. I have over 6K friends/followers on the account! I sent an email to disabled@facebook – I am hoping that I actually get a human response. I feel sick about this. If you have any advice or suggestions, please let me know!
Holly the Mormon Soprano recently posted..Christmas Gift: 5 Free Song Downloads!
December 7, 2014 8:29 pm
@Holly – Oh wow, that’s all sorts of craziness! I think your best bet is to get FB to help you convert your profile to a page, since that’s what you wanted to do all along. Did you try submitting an appeal? You can do that here if your account is still disabled: https://www.facebook.com/help/contact/260749603972907
Then if they haven’t converted your profile to a fan page already, you can read more about how to do that here: https://www.facebook.com/help/175644189234902
Good luck!!
December 8, 2014 12:06 pm
OK thank you for the links and the advice. Interestingly enough, I decided to try putting my first name into the name box of the facebook profile and it unlocked it. Yay. Now I have to follow all of the directions to transfer it into a page. I will reference your instructions and the above link.
Have you ever downloaded your info from a profile and then uploaded again? It is telling me to download all of my info from the profile because it does not transfer over to a PAGE once it is converted. Then I will have to put it all back. Just wondering how well that works! Cheers – Holly
Holly the Mormon Soprano recently posted..Hark The Herald Angels Sing: A Story and Song
December 14, 2014 9:52 pm
Hi Holly, I’ve never gone through converting a profile to a page, so I’m not sure exactly how it works. From my understanding, you will need to put the content back manually and any likes/comments from those will have been lost along with images you may have shared. It’s certainly not ideal, especially if you have a lot of posts, but at least you do retain your fans.
January 12, 2015 5:32 pm
I have created a page for my personal use in showing off items I would like to sell within my groups. The problem I’m having is when a person likes my “other” page as “their other page” aside from their profile page. I cannot like another page as my “other” page if that makes sense. As in “Liking as a page not a person” Can you help me please? I have read all FB help topics but cannot find anything that shows me how to do it. I have received all your tutorials since you started your “little fat notebook” and cannot find anything that covers this topic. Kindest Regards, Sandie.
January 28, 2015 10:06 pm
Hi laelene, I apologise for my last post ( January 12, 2015 5:32 pm) as it is a bit confusing when I went back and re-read it.
Did you understnd what I was trying to explain or did you find it confusing too?
Sandie.
February 1, 2015 12:56 pm
Hi Sandie, I think I know what you mean. Facebook has made it easier to switch between your personal profile and any pages you manage. When you want to post as the page, go to the top right icon in the blue bar. You should see a down arrow. Clicking on that will allow you to use Facebook as other profiles. Does that make sense and answer your question?
February 7, 2015 12:22 am
Hello Iaelene, Thank you for your reply 🙂
I found what you described thank you.
I also found another way, in making a comment on any person’s page or Group or comment, there is a faded out flag in the lower bottom right of some business comments that you can reply to as yourself or as a “page you mange”. Thank you so much for your help 🙂
Kindest Regards, Sandie.
February 28, 2015 10:58 am
Thank you so much for this! It was a huge help!
April 25, 2015 2:31 pm
I created a fan page for my new blog. But I do not get the Edit page function or administrative function. Have I done something wrong?
April 25, 2015 8:11 pm
First, I’d make sure you’re logged in with the same FB profile you used to create the page (in case you have others you use or you got logged out). You should see a white menu bar underneath the blue one when you are at the URL of your new page. On the right half of the menu is the Settings option, where you can control your page.
June 8, 2015 8:42 pm
Have been searching the net on how to go about this! Thank you!
Hazel Ann Lo recently posted..Prenuptial Shoot Musings
June 19, 2015 1:00 am
I carefully read your tutorial but still don’t find an edit button 🙁
June 29, 2015 8:30 pm
Found your blog so in time for me to create mine. Thanks for the sharing! Good day!
Michele_kung recently posted..[先吃为快]- 《小田佳园》宇治抹茶手工凤梨酥 Uji Matcha Pineapplecake @ Gartien.com, Penang
July 30, 2015 7:11 pm
You don’t have to wait until you get 25 likes, all you have to do is use your cellphone number and you create Facebook.com/whatever name…
just go to page info and and go to create Facebook Web Address it will ask for cellphone number or you can wait until you get 25 likes, i took the easier route and gave them my cellphone number..
thanks for tutorial..