Posts Tagged ‘pinterest’

How to: Claim Your Username and Vanity URLs

laelene Posted in how to guides,Tags: , , , , , , , , , , , ,
7
Ever want to claim “facebook.com/yourbrand” only to find it was taken? Rather than accepting that and settling for something like “facebook.com/yourbrand123″ (which is less than optimal), read on to learn how you might be able to get what is rightfully* yours.

First let me start by saying that most sites already use vanity URLs, so whichever username you choose will usually end up being in your URL. For example:

http://twitter.com/maryqin
http://pinterest.com/maryqin
http://instagram.com/laelene

For these sites, the issue of the getting the vanity URL you want ends up being the same as getting the username you want. Once you get the username, you get the associated URL.

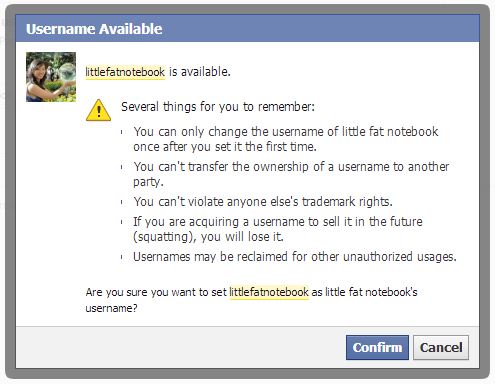
Now Facebook is an exception to this and you actually have to set the vanity URL yourself. They start you off with some ugly URL like http://www.facebook.com/pages/little-fat-notebook/457453117668145. Just go to the username settings page to change it to something pretty like http://www.facebook.com/littlefatnotebook. You can do this for your personal profile as well as any Facebook pages you manage. The cool thing is that usually you have to wait until you have 25 fans on a page before you can set the username, but by doing it this way you bypass that requirement! [Edit: Looks like there still might be a minimum – I was able to set the username with just 16 fans but I can’t for another page that only has 4 fans right now.]

facebook page set username

facebook page set username confirmation

Ok, so let’s say you’re claiming these usernames for your brand and you find someone has already taken them. You may not have to resort to choosing a different username – there’s an option to try to claim the username by reporting trademark infringement. A few tips for improving your chances of filing a successful claim:

1. You should own the domain name related to the username you want. For example, I own pandaloves.com and I wanted facebook.com/pandaloves and twitter.com/pandaloves

2. Even better if you actually own the trademark for the name in question, but it’s not necessary. If you do own it, make sure you can prove it to help your case. I never registered a trademark for my brand’s name, Panda Loves, but that was fine.

3. If you do own the domain (i.e., pandaloves.com), use an email set up from that domain for more credibility. This shows that you are an authorized representative of the business. I used contact@pandaloves.com as my contact email when I filled out the form.

I came across this helpful article for claiming usernames on Facebook and Twitter, which you should read if you are claiming a username on either site. I was able to successfully claim both usernames on Facebook and Twitter, but not Pinterest (they never got back to me). I haven’t tried for other sites.

For Facebook, go here to fill out the form: https://www.facebook.com/help/contact/208282075858952

For Twitter, there are two routes you can take depending on if you own the trademark:

https://support.twitter.com/forms/impersonation (if you don’t own the trademark)
https://support.twitter.com/forms/trademark (if you do own the trademark and have proof)

And for other sites, I located articles that can help with the claim process. For any site not listed, do a search in their help section for terms like “trademark infringement” or even “impersonation” to locate more information.

Pinteresthttp://about.pinterest.com/trademark/
YouTube: http://support.google.com/youtube/bin/answer.py?hl=en&answer=151655
Etsyhttp://www.etsy.com/help/article/17
Instagramhttp://help.instagram.com/customer/portal/articles/118970-trademark-policy-for-instagram-usernames

Let me know if you have any further questions or how it goes when you do file your claim on these sites! Good luck!


*This is, of course, assuming that it is your right: that you are trying to claim the name of a brand you own and not take someone else’s.
(The) Cat Chronicles

laelene Posted in general blog,Tags: , , ,
0

I was organizing my pictures the other day when I came to realize that I have far too many cat photos. Not that I’m sick of them, but for a blog like this where I want to have a good variety of subjects/topics, I don’t have enough real estate to dedicate to my cats. So, for that reason, I’ve decided to post up pictures of my cats over on Tumblr. Maybe nobody will ever go look at them, but at least I have an outlet somewhere where I can post up pictures of all things cat.

After all, I’m really blogging for myself a lot of the time – for my unwavering desire to document and chronicle things.  So here’s to my cats!  And if you like them too, go follow the cat chronicles and get your daily dose of cuteness. 🙂  You’ll also find them on my corresponding Pinterest board.  I’ll still be posting some pictures and videos of my cats here, since they are an important part of my life that I like to share. However, there’s just so much cat-centric content that I want to put out there that it really needs its own channel.

How to: Link Social Media Accounts

laelene Posted in how to guides,Tags: , , , , , , , , ,
2

With the ventures I’ve been working on, much of my time and effort have been spent figuring out the nuances of social media.  I think these issues are pertinent to many people, particularly business owners, so I’ve decided to put together some of the lessons I’ve learned and tips for how to improve your experience and avoid pitfalls.  These will be filed under the “social media lessons” category, so you can filter by category to sort by relevant posts.  Hopefully you’ll find these things useful in optimizing your own social media strategy!

social media icon buttons: facebook, twitter, pinterest, instagram, vimeo, etsy

Icons courtesy Brandi Girl

Today I’ll cover how to link your social media accounts to offer consistency across social media platforms.  It can be quite time-consuming to post content across platforms, so why not link them and get more bang for your buck?  Most sites will allow you to connect with Facebook and/or Twitter to post your activity and updates; just check the settings and look for something like “Sharing Settings” or “Connect Accounts.”

First, you can interlink your Facebook Page and Twitter accounts.  That way, any post on Facebook gets updated to Twitter, and any update on Twitter gets updated to Facebook (except @replies and direct messages).

Link Twitter to your Facebook Page

  • You will be prompted to use Facebook as yourself (instead of as your Facebook Page) if you aren’t already.
  • Your personal Facebook account and any Facebook Pages that you are an admin of will be listed.
  • On the right side, click “Link to Twitter” for the account you want to link.
  • On the next page, make sure you’re logged in to the correct Twitter account and click “Authorize app.”
  • You will be returned to the previous page, where you can choose what to share (Status Updates, Photos, Video, Links, Notes, & Events). By default, they will all be checked so all updates will be shared on Twitter as well.

 
Link Facebook Page to your Twitter account

  • Scroll down to the Facebook section and click “Sign in to Facebook and connect your accounts.”
  • There will be a pop-up prompting you to allow Twitter access to your personal Facebook account. Allow it.
  • Now your account is connected to Facebook and you can choose to allow Twitter to post to your personal profile page, or one of the Facebook Pages that you are an admin of.


For all the rest, make sure you are signed in to the correct Facebook and Twitter accounts first.

Link Facebook* & Twitter to your Pinterest account

  • Scroll down to the Facebook section and click “Login with Facebook.”
  • There will be a pop-up prompting you to allow Pinterest access to your Facebook account.  Allow it.
  • Now “Login with Facebook” will be ON and you can choose to also turn “Publish activity to Facebook Timeline” to ON. If you do, another pop-up will prompt you to allow that type of access to your Facebook account.  Allow it if you want Pinterest updates to show up in a box on the right side of your timeline.
  • In the Twitter section, click “Login with Twitter” and authorize the app.

 
Link Facebook, Twitter, & more to your Instagram (instructions for iPhone app – Androids may vary)

  • Open up the Instagram app on your device and click on the icon that shows you your profile (bottom right).
  • Tap on the settings icon in the top right corner.
  • Scroll down to “Sharing settings” under the Account header.
  • Tap on that and choose the accounts you want to link. You’ll be prompted to log in and allow access.
  • For Facebook, your personal profile will be connected by default, but you can change it to a page by clicking on “Facebook,” then “Post to.” This will take you to a page in the FB app. Allow access here to then be able to connect Instagram to one of the Facebook Pages that you are an admin of.


  • Click “Connect” next to the account you want to link.
  • You will be prompted to allow access. When you accept, your account will be linked.
  • For Facebook, you will automatically be connected as yourself, but you can choose to link to a Facebook Page that you are an admin of instead by clicking on the dropdown.
  • Note that Vimeo will only send updates when you ‘like’ a video. When you upload a new video, you will need to manually choose “Share” in the top right corner of that video.

 
Link Facebook* & Twitter to your Etsy account

  • Click on “Connect with Facebook” and/or “Connect with Twitter” under the Connected Accounts section
  • You will get a pop-up prompting you to allow permission. When you do, your accounts will be linked.
  • For Facebook, you have the option of sharing your Favorites from Etsy on Facebook. Check the box if you’d like to, otherwise leave it alone.


*Pinterest and Etsy don’t appear to allow you to link your account to a Facebook page – right now you can only post updates to your personal timeline.


Is there another social media platform you’d like to see here?  Did I miss a step anywhere?  I’d love to hear some feedback.  Let me know if it worked for you (or what happened if it didn’t).

Related Posts Plugin for WordPress, Blogger...