Posts Tagged ‘tutorial’

How to: Create A Facebook Page

laelene Posted in how to guides,Tags: , , , , , , , ,
27

[Editor’s Note: This is an updated version of the original blog post that is now nearly three years old! This includes up-to-date instructions after some changes to Facebook’s interface.]

pinnable quote image for how to create a facebook page blog post on maryqin.com

I decided it was time for me to create a Facebook page for my little blog, so I can really try to build it out and maybe get some followers! I’d like to think that what I’m putting out there is educating or entertaining someone, but I’ve never really promoted it so it’s time to take action.

When I went to create the FB page, I (for the life of me) could NOT find where to choose the “Personal Blog” category! And that’s what spurred this entry. Read on to learn the basics for setting up a Facebook page and how to select a category like “Personal Blog,” “Personal Website,” and more!

Creating Your Facebook Page
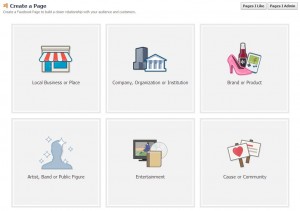
webpage to create a new facebook page First of all, here’s where you can create a new Facebook page. As you’ll see, right away they want you to choose a category. Your desired page may fit multiple categories, so it’s up to you to decide which one is best for your needs. Of the 6 types they’ve laid out for you (1. Local Business or Place; 2. Company, Organization or Institution; 3. Brand or Product; 4. Artist, Band or Public Figure; 5. Entertainment; 6. Cause or Community), all but the last one have a dropdown menu with category choices. Don’t worry if your desired category isn’t there – just pick what’s closest or tickles your fancy. In my case, I went for “Brand or Product”and chose “Website” from the dropdown.

You will be asked to enter your page name, which should be the title of your blog, the name of your business, or whatever you want the world to know your page by. Note that Facebook has certain rules in place about what is allowed in a name – for example, I tried to enter my blog name, ((little fat notebook)), but it was immediately rejected because I’m not allowed to use symbols. You are allowed one set of parentheses, but there can only be two words in it (like this) and obviously I’d have three if I went for (little fat notebook). Alas, I then tried just plain “little fat notebook” and that’s not allowed because the name must start with an uppercase! I didn’t like how Little fat notebook looked, so I went for the boring old Little Fat Notebook. Luckily, you can change it after the fact!

Setting Up Your Facebook Page

Once you agree to their terms and click Get Started, you’re prompted to fill in a description and add links to your site(s). They now allow you to choose your vanity URL (the pretty one that looks like https://www.facebook.com/littlefatnotebook instead of https://www.facebook.com/pages/little-fat-notebook/457453117668145). Check out my post on claiming vanity URLs to learn more. Choose carefully, you can only ever change it once after that. Next upload an avatar/profile picture to represent your page.

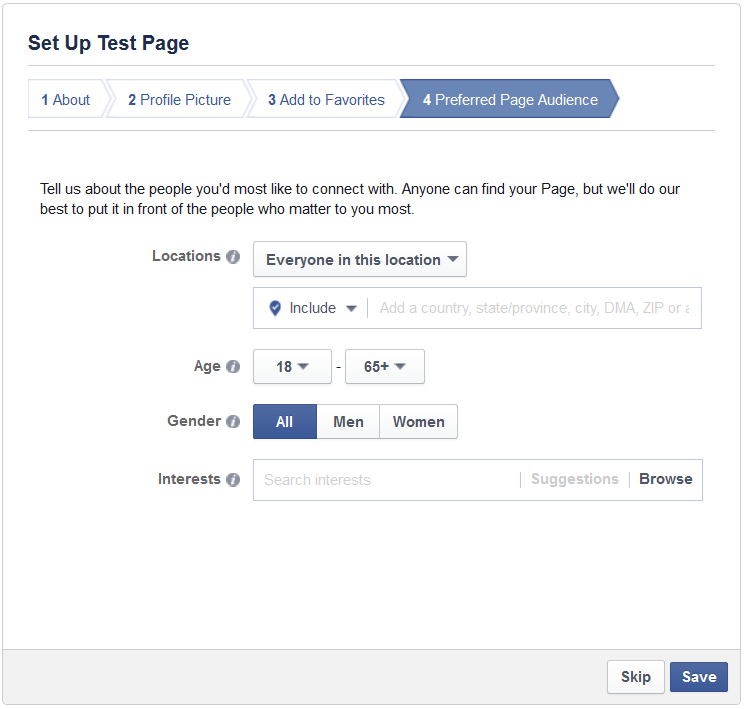
You can then add this new page to your Favorites area for quick access. That’s the part on the left when you go to Facebook.com. Finally, you can indicate your target audience including where they’re located, what age range they’re in, their gender, and their indicated interests. You’ll then be taken to your brand new Facebook page! A quick tour is given and then you’re given free reign. Feel free to add a cover photo, invite friends to like your page, and share your very first post!

area to set up target audience of new facebook page

Changing To A Better Category

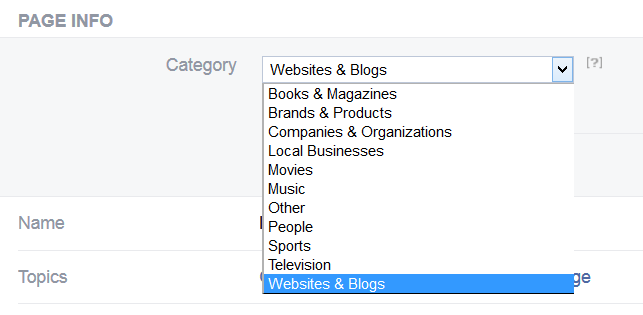
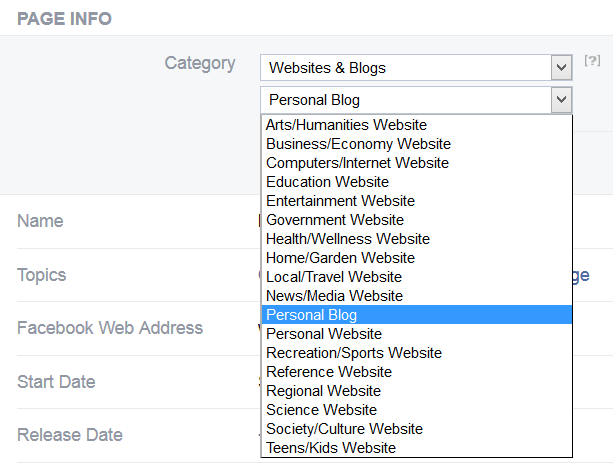
settings option for facebook pageNow here’s what you’ve been waiting for: how to make the page exactly as you want it! Under the cover photo area, click About. This takes you to Page Info where you’ll see the category you chose. Alternatively, at the top right, you’ll see Settings, which takes you to a page full of them. Along the left is a menu with “Page Info” – that brings you to the same place. Hover over the Category section to find the Edit button. From there you’ll see that the category and subcategory choices are far more plentiful than they let on earlier in the process! That’s where I found a previously unmentioned category called “Websites & Blogs,” which contains the subcategory option I had been hunting for: Personal Blog. The nice thing is that you can change this at any time, so as your site/brand evolves, you can update the category accordingly.page info section of facebook page

dropdown menu to edit facebook page category

dropdown menu to edit facebook page subcategory

So there you go! I hope that helped. If you found it useful, please like my page to show your support. 🙂

A few other tips:

When you reach 30 fans, Facebook will provide “insights” about your page, which include data about the reach of your page and each post (how many people see it, pretty much), how many people are talking about (sharing) your posts, and how many posts you’re putting up daily. You can also find cool demographic information about your followers. Basically if you’re into data, you’re going to love this part.

Note that I was able to update my page name from Little Fat Notebook to all lowercase. Unfortunately you still can’t add symbols, but as mentioned before, you can use one set of parentheses.

From now on, you can choose to interact with Facebook as yourself (personal profile) or your Page. This option is available for anything public that multiple profiles can access. You won’t see it for posts related to your private friends, for example, since Pages cannot post to personal profiles. But on other pages, you can choose to comment/like as yourself or your Page.

dropdown menu to choose facebook profile or page to interact as

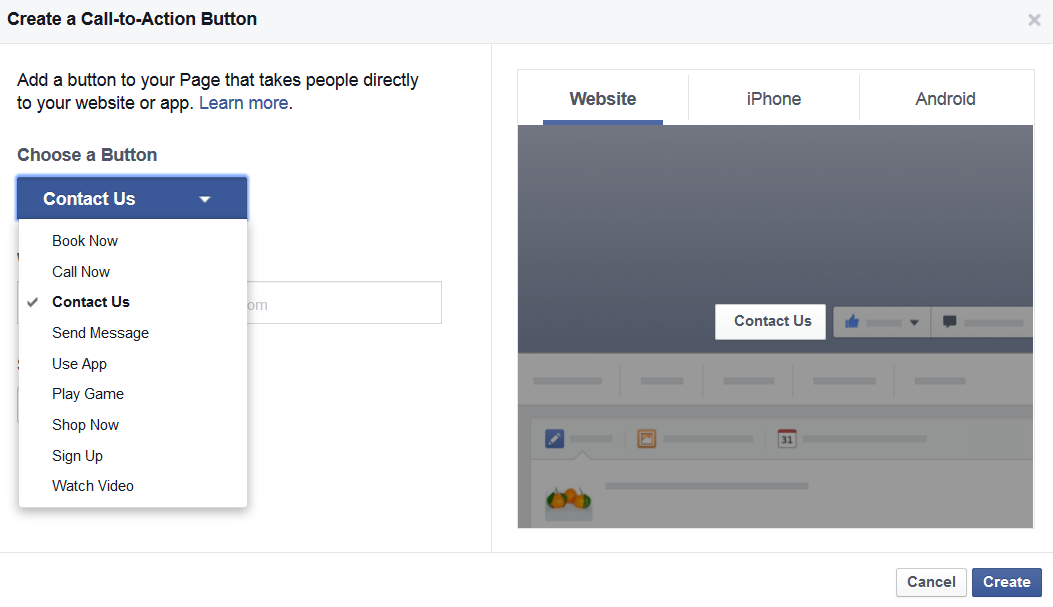
I used to highly recommend putting your website URL in the Short Description so users can easily click to your site from your FB page. Now Facebook has added a Call to Action button instead, so you can set that up to get users to your site. None of the options are particularly blog-friendly though, so I’d like to see a “Read More” or “Read Now” action.

dropdown menu to set facebook page call to action button

Now that you have a Facebook page, check out my tutorials on:
~how to manage your Facebook page
~how to link your social media accounts
~how to claim your vanity URLs (as mentioned earlier in the post), and more!

You can find all my “how to” posts for useful tips like how to make a favicon and random things like how to set your iPhone/iPad to stop playing music at a certain time or even how to win a Facebook contest!

If you have any questions or tips of your own, I’d love to hear them! Please do share. 🙂

How to: set keyboard shortcuts

laelene Posted in how to guides,Tags: , , , , , , , , ,
0

Save time by setting your own personalized keyboard shortcuts on your iDevice! If you type a lot on your Apple device, there are probably certain words and phrases that you input all the time. In my case, I kept meaning to set up a shortcut for my email address so I don’t have to fill it out each time. This also helps prevents any typing errors I might have.

To set your own, go to Settings>General and scroll down to Keyboard. At the bottom are shortcuts and some might have been created for you already (like “omw” becoming “On my way”). Tap “Add New Shortcut…” to create custom ones.
The first line, Phrase, is what you want to be filled in when you use the shortcut.
The second line, Shortcut, is what you want to type to trigger the replacement.

screenshot of area in iphone settings to create keyboard shortcut

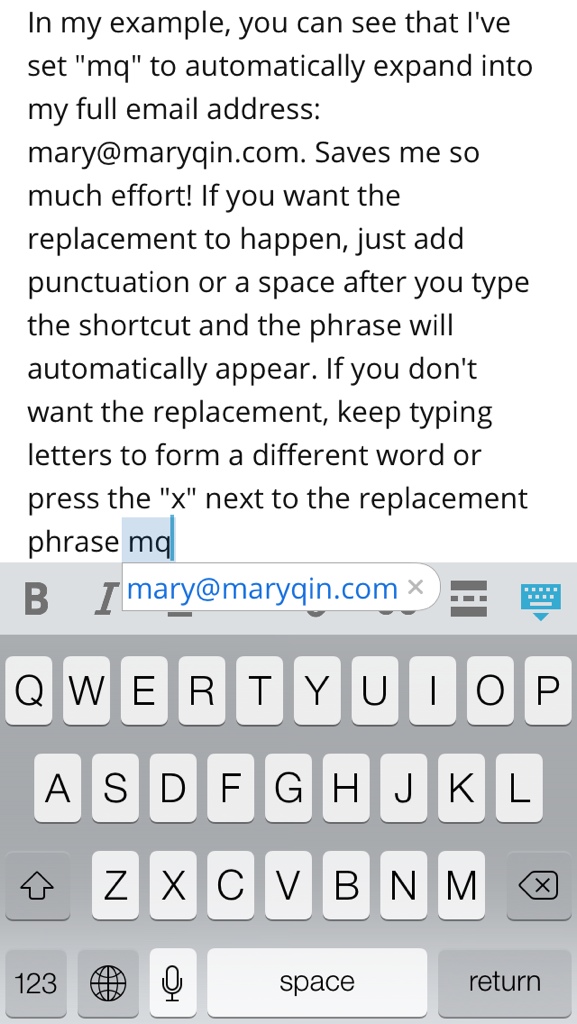
In my example, you can see that I’ve set “mq” to automatically expand into my full email address: mary@maryqin.com. Saves me so much effort! If you want the replacement to happen, just add punctuation or a space after you type the shortcut and the phrase will automatically appear. If you don’t want the replacement, keep typing letters to form a different word or press the gray “x” next to the replacement phrase as shown.

using keyboard shortcut in action on iphone

Easy! And now you can prevent excessive time being spent typing the same things over and over. 🙂

How to Apply for a Chinese Visa

laelene Posted in how to guides,Tags: , , , , , , , , ,
1

What a ride it’s been applying for my visa to go to China! I watched as time after time, people were turned away because they didn’t have everything they needed for the application. It seems that the law changed in the past couple of years, so those who had been getting visas to China for over 20 years suddenly found themselves no longer meeting the requirements for the application (on their first try anyway). I don’t think a single person who was there for the first time had a successful experience. So, to help you avoid a similar fate, here’s what I learned to make your visa application process as painless as possible.

Short on time? Skip right to the tips list.

First and foremost, PREPARE thoroughly.

When I first saw the extensive forms of visas, I had no clue which one I wanted and I didn’t pay much attention to the requirements. After all, I’d done it plenty of times before so how hard could it be? Oh no, how naive I was. First of all, you have to fill out the form ahead of time. There are no longer forms at the embassy – my first big mistake. Luckily, there is a well-situated travel agency upstairs from the visa office in DC (what a smart move on their part), so I went there and paid $10 to fill out my form on a computer and print it out. Avoid those mistakes and download a copy and print it yourself.

sign and entrance to chinese embassy visa office in washington dcAll applicants are going to want to have a photo copy of their passport ID pages (for the office to keep once they return your passport to you), previous visa(s) to China if this is not your first, and a copy of your itinerary (proof that you will leave the country within an appropriate time period). If you’re like me and just got a new passport, you’ll want to bring copies of your old passport and visas that you had in there. If you’re getting a special visa that lasts beyond the typical maximum of 12 months, there are other documents to provide. This usually includes a signed letter from a Chinese native/resident or company, inviting you to the country and explaining the purpose of your visit.

Plan for at least 40-60 minutes at the visa office

Don’t forget to bring all your documentation! When you arrive, you’ll almost always find a dozen or more people in line to submit their application and it’s a painfully slow process. After all, they have to be thorough in reviewing your application. They also often have to explain exactly what is missing from an application so people can get it right the second time. And inevitably, there are those frustrated people who spent hours getting to the office only to find out they have to make another trek, so they vent and sometimes demand managers.

Wait patiently for 3-4 business days, then pick up your visa

chinese embassy visa office windows for payment and pick upWhen you leave after submitting your application, you’ll get a receipt – hang on to it! It lists the date your visa will be ready and if you don’t get a call by that time, it means your visa should be ready with no issues. Picking up the visa is pretty quick, thankfully. Go first to the payment window and they’ll process your payment. All visas cost the same, no matter the length of validity and they’re currently at $140 for US citizens. I paid by credit card and then took my receipts over the to pick up window when the lady returned. She located my passport and showed me the page with the visa on it. I checked to make sure it was accurate – correct personal information, appropriate expiration date (two years from now, woo hoo!), and actually in my passport.

chinese visa payment window with receipt slip and stamp

Payment time.

passports in boxes ready for pick up after getting chinese visa

Boxes of passports.

So here’s a recap of the main points:

Download the application and bring it filled out along with a 2×2 photo attached (no more copies offered at the visa office)

Bring
-photo copy of passport
-copy of old passport (if recently outdated)
-copies of previous visas (if you’ve had any before)
-copy of travel itinerary (if already booked)
-invitation letter with name, ID number, and address of inviter (Chinese citizen or resident) – also include your name and passport number as invitee
-copy of front and back of ID of inviter

Apply at least 5 business days prior to intended travel (but preferably closer to 8-10 days in case there are issues)

When picking up your visa, bring form of payment (credit card is fine) and receipt slip

Did I forget anything? Do you have any lessons learned to share?

How to: Create A Facebook Page (original)

laelene Posted in how to guides,Tags: , , , , , , , ,
104

pinnable quote image for how to create a facebook page blog post on maryqin.com

I decided it was time for me to create a Facebook page for my little blog, so I can really try to build it out and maybe get some followers! I’d like to think that what I’m putting out there is educating or entertaining someone, but I’ve never really promoted it so it’s time to take action.

When I went to create the FB page, I (for the life of me) could NOT find where to choose the “Personal Blog” category! And that’s what spurred this entry. Read on to learn the basics for setting up a Facebook page and how to select a category like “Personal Blog,” “Personal Website,” and more!

Creating Your Facebook Page

webpage to create a new facebook page First of all, here’s where you can create a new Facebook page. As you’ll see, right away they want you to choose a category. Your desired page may fit multiple categories, so it’s up to you to decide which one is best for your needs. Of the 6 types they’ve laid out for you (1. Local Business or Place; 2. Company, Organization or Institution; 3. Brand or Product; 4. Artist, Band or Public Figure; 5. Entertainment; 6. Cause or Community), all but the last one have a dropdown menu with category choices. Don’t worry if your desired category isn’t there – just pick what’s closest or tickles your fancy. In my case, I went for “Brand or Product”and chose “Website” from the dropdown.

You will be asked to enter your page name, which should be the title of your blog, the name of your business, or whatever you want the world to know your page by. Note that Facebook has certain rules in place about what is allowed in a name – for example, I tried to enter my blog name, ((little fat notebook)), but it was immediately rejected because I’m not allowed to use symbols. You are allowed one set of parentheses, but there can only be two words in it (like this) and obviously I’d have three if I went for (little fat notebook). Alas, I then tried just plain little fat notebook and that’s not allowed because the name must start with an uppercase! I didn’t like how Little fat notebook looked, so I went for the boring old Little Fat Notebook. Luckily, you can change it after the fact!

Setting Up Your Facebook Page

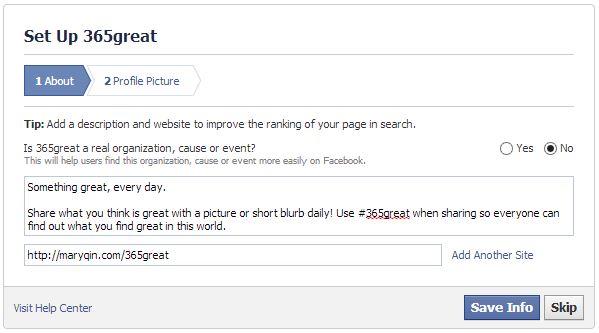
Once you agree to their terms and click Get Started, you’re prompted to fill in a description and add links to your site(s). Next upload an avatar/profile picture to represent your page. You’ll then be taken to your brand new Facebook page! A quick 3-step tour is given and then you’re given free reign. Feel free to add a cover photo, invite friends to like your page, and share your very first post!

screenshot of page to set up about section of new facebook page

Adding a basic description.

uploading profile picture to new facebook page

Uploading a profile picture.

Changing To A Better Category

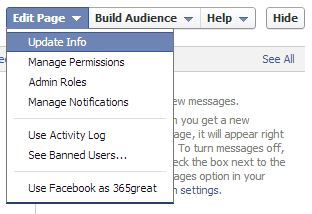
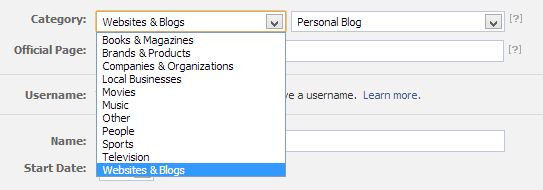
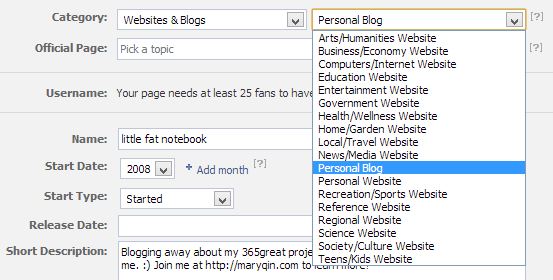
dropdown menu to edit facebook page infoNow here’s what you’ve been waiting for: how to make the page exactly as you want it! At the top, you’ll see an option to Edit Page, with a dropdown. The first option is what you want: “Update Info.” Here you’ll see that the category and subcategory choices are far more plentiful than they let on earlier in the process! That’s where I found a previously unmentioned category called “Websites & Blogs,” which contains the subcategory option I had been hunting for: Personal Blog. The nice thing is that you can change this at any time, so as your site/brand evolves, you can update the category accordingly.

dropdown menu for facebook page categories


dropdown menu for facebook page subcategories


A few other tips:

Once you get 25 fans, you can reserve a vanity URL (or username, as Facebook calls it). This means that rather than an ugly URL like https://www.facebook.com/pages/little-fat-notebook/457453117668145, you can get a pretty one like https://www.facebook.com/littlefatnotebook, which is much easier to direct fans to. I still need to claim mine! (So hey if you don’t mind, please like my page so I can claim my vanity URL soon!) [Update: I was actually able to claim it when I had just 16 fans – check out my post on claiming vanity URLs to see how.]

When you reach 30 fans, Facebook will provide “insights” about your page, which includes data about the reach of your page and each post (how many people see it, pretty much), how many people are talking about (sharing) your posts, and how many posts you’re putting up daily.

Also note that I was able to update my page name from Little Fat Notebook to all lowercase. Unfortunately you still can’t add symbols, but as mentioned before, you can use one set of parentheses.

I highly recommend putting your website URL in the Short Description so users can easily click to your site from your FB page. Just be sure to input the “http://” so it becomes a clickable link, as shown. (Click for full size.)

screenshot of facebook page short description with embedded link

Now that you have a Facebook page, check out my tutorials on:
~how to manage your Facebook page
~how to link your social media accounts
~how to claim your vanity URLs, and more!

You can find all my “how to” posts for useful tips like how to make a favicon and random things like how to set your iPhone/iPad to stop playing music at a certain time or even how to win a Facebook contest!

If you have any questions or tips of your own, I’d love to hear them! Please do share. 🙂
How to: Change WordPress Permalinks

laelene Posted in how to guides,Tags: , , , , , , , ,
4

Whew! Just went through quite the headache’s worth of trouble trying to optimize my site and I want to save YOU the same trouble. Here’s a walk-through of how to ensure your old links redirect to your new links and nothing else breaks in between! (Note that this tutorial is for self-hosted WordPress blogs.)

You can read through the lessons I learned along the way, or skip straight to the step-by-step.

It started when I read about why you shouldn’t have dates in your permalink structure. This got me thinking and I agreed that most bloggers should strive for timeless content (plus I want more people clicking through from search results). People may be deterred if they see your post is “old” but that doesn’t mean it’s irrelevant to their needs! So, I decided to make the leap from https://maryqin.com/[year]/[month]/[postname]/ to just https://maryqin.com/[postname]/.

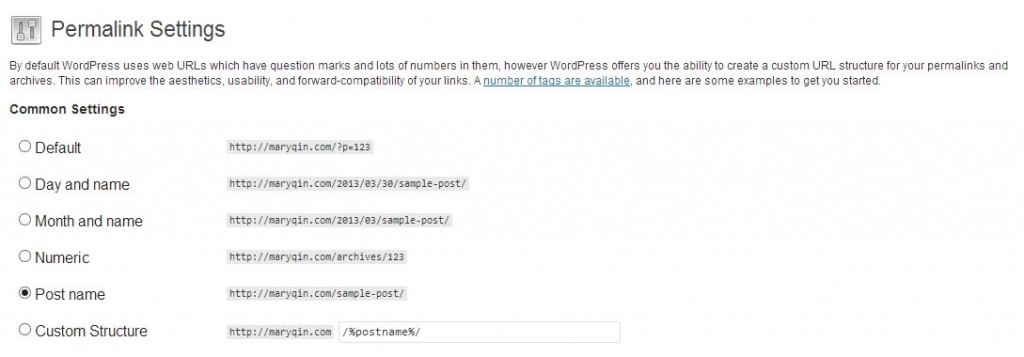
That’s easy enough – just go your WordPress admin and find Settings > Permalinks in the lefthand toolbar. Choose the radio button that says “Post Name” as you can see I did here:

wordpress permalink settings screenshot

Your links are now updated! But if you’re like me, you linked to your blog on other sites using the old URL structure. Users who click on that would get taken to your homepage and not to the post in question, so they are likely to get confused and leave. We don’t want those linkbacks to be wasted, now do we?! This is where a 301 redirect comes in. I was told to get the “Simple 301 Redirects” plugin but I found that it only worked if I input every redirect I wanted individually. The method for doing a “mass redirect” just wasn’t working, so despite the warnings against the “Advanced Permalinks” plugin, I decided to give it a shot.

I had actually found that plugin on my own before reading up on tutorials and I probably should have just gone with it from the start. Oh well, at least I’ve figured it out now! Once I activated Advanced Permalinks, I went back to Settings > Permalinks and there were some new options available. I couldn’t figure it out on my own, so I found an article that helped me understand what to do. I went to Migration up top and put in “/%year%/%monthnum%/%postname%/” (my old permalink structure) and BAM my links were redirecting to the new ones. Only later did I notice that my categories had broken!!

Sooo it was back to troubleshooting. I managed to figure out that it was indeed this plugin causing the issue, so I looked for a way around it. Luckily, I came across a helpful article in the support forum that showed me a quick recode was all I needed: see steps 5-7 below.

Here is the entire process broken down:

Step 1: Download & activate Advanced Permalinks plugin.

Step 2: Go to Settings > Permalinks and choose “Migration” along the top.

Step 3: In the “Old Permalink” box, input your old structure, i.e. /%year%/%monthnum%/%postname%/, and click Add.

Step 4: Test links with the old permalink structure to ensure they are redirecting properly. Your categories are likely broken at this point (if not, yay, you’re done!).

Step 5: To fix the broken category links, go to Plugins > Editor and choose Advanced Permalinks in the top right dropdown (it might already be open since plugins are arranged alphabetically).

Step 6: Make sure the file open is “advanced-permalinks/advanced-permalinks.php” and search for “$this->add_filter (‘category_rewrite_rules’);

Step 7: Add // in front so that you have “//$this->add_filter (‘category_rewrite_rules’);” and click Update File. Done!

Now your links should all be working and the categories won’t be broken. If you run across any other issues, let me know and we can troubleshoot together!

iPhone online ordering process

laelene Posted in how to guides,Tags: , , , ,
1
screenshot of apple store iphone 5 preorder page

Source: Apple.com

Holding out on upgrading your phone to see if any issues crop up?  Or maybe you’re just waiting for your previous 2-year contract to expire before you upgrade.  Well, if you decide you want to get the iPhone 5 and would like to make sure you’ve prepared everything needed to get through the online ordering process without a hitch, here is a step-by-step of what to expect*:

1.  In  the Apple Store’s iPhone section, choose your color (black or white), storage capacity (16, 32, or 64 GB), and carrier (AT&T, Verizon, Sprint, or get an unlocked phone for a higher price point).
2.  If you chose one of the three carriers with contract requirements, you’ll then need to indicate if you are creating a new account with the carrier or already have one.  If you have one, you can either replace a current phone on your account or add a line.  (Sprint options vary slightly.)
3a.  If you create a new account: you’ll go through and pick out the details, including minutes, data, and text messaging options.  Then you can choose to get a new number or transfer your current one.
 If you get a new number, you’ll enter your billing info, birthday, and SSN.  The carrier will do a credit check on you, you will have to pay an activation fee, and you’ll be signing up for a 2-year contract.  Here Sprint also asks for you to create a PIN.
 If you transfer your current number, they will ask for your current phone number, account number, and password for the carrier (if applicable).
3b.  If you have an existing account (either replacing a current number or adding a new one): you will then be prompted to enter your wireless number, billing zip code, last 4 digits of SSN, and billing password, if you have one.  At that point, see 3a if you’re adding a line, otherwise Apple will check your eligibility for an upgrade, which will determine how much the iPhone will cost you.  You’ll then want to confirm the monthly plan you want, either keeping what you have already or changing it.

Note:  With Verizon, upgrading to the iPhone 5 means changing to LTE service, which voids any grandfathered plan you may be on (i.e. an unlimited one).  Therefore, you will automatically have to choose a different plan if you currently have unlimited data with them.  With AT&T, you get to keep your grandfathered plan, but you will not be allowed to use the FaceTime on cell service feature.  If you want to FaceTime while on the go, you will have to get a shared data plan, which means you forfeit your grandfathered plans.

4.  Then you will be directed to sign in with your Apple ID.  If you’re a new customer, you’ll need to create one.
5.  You will now be able to review your order, including the phone model and phone plan that you chose.  Confirm the shipping address and shipping method are the ones you want.  During pre-orders, you will not be allowed to edit the shipping address at this stage, but you can do so once the order is placed.  The shipping method for pre-orders defaults to standard free shipping and cannot be changed.
6.  If you want to edit your cart, you can do so here.  Otherwise, go ahead to checkout to complete your order!

*Note that some instructions may not be complete since I didn’t have the appropriate information to go forward.  I will update if I do get access.

Related Posts Plugin for WordPress, Blogger...